In my last post I shared tips on setting up a sound wall in your kindergarten or early elementary classroom. Now, it’s time to talk about ideas for using your sound wall.
A sound wall is a valuable teaching tool that helps students connect speech to print and build the phoneme-grapheme correspondence needed for decoding and reading words. Its success in the classroom is very dependent on having a good understanding of why and how to use it with your students. While I am sharing some helpful tips in this post, I highly recommend attending professional development classes and/or doing some additional research on your own to gain knowledge about all of the research and science behind it as well as best practices. I will list some helpful resources at the end of this post.
The more you interact with your sound wall, the more your students will as well. Refer to it often for spellings and sounds.
Daily lessons do not have to be long. It is recommended they last 3-7 minutes. It is also recommended that you review previously learned sounds as part of your daily routine.
As far as what order to introduce the sounds, I recommend introducing each sound according to your curriculum’s phonics or alphabet scope and sequence.
Use mirrors. It is recommended in many trainings that I have attended that students use mirrors to see if they are doing the sounds correctly and to observe what is happening in their mouths when making the sounds. You can purchase small mirrors for each student and/or hang a mirror on your sound wall. If you have iPads, another option is to have students use the camera like a selfie and look at their mouths. They can even take photos or videos!
Sound Wall Lesson Suggestions & Tips
These lessons suggestions follow the I Do – We Do format.
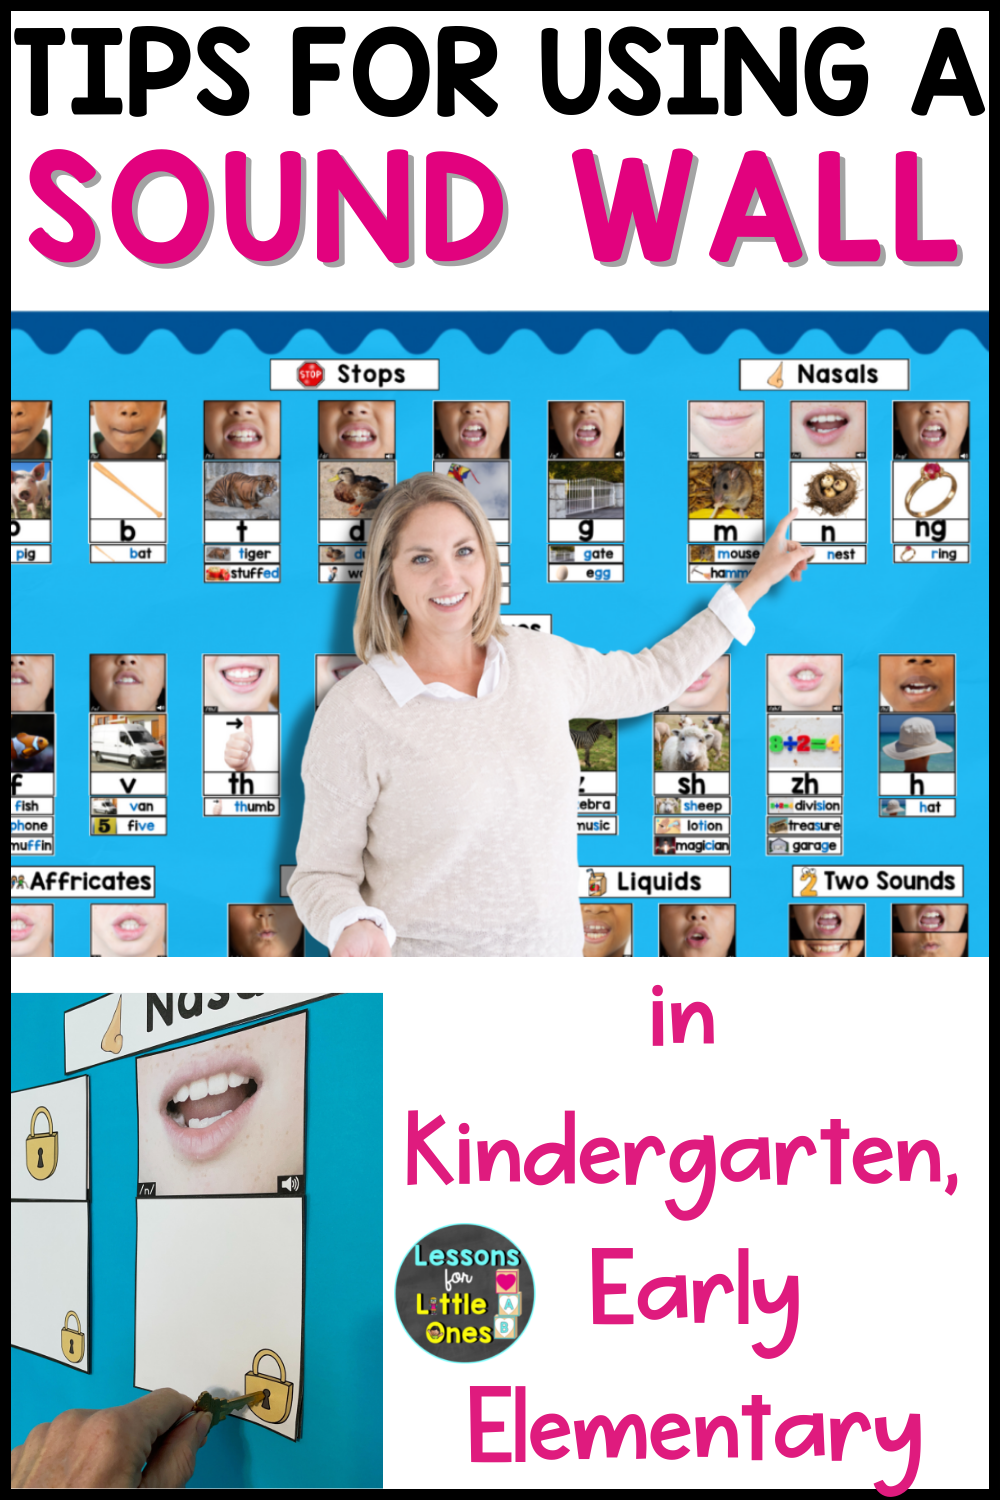
When introducing the sound wall to your students, explain that you are going to start learning the 44 different sounds of our language and they are displayed on this wall. Each sound will be revealed as we learn it. Learning these sounds will help them become better readers and spellers.
When using a sound wall with young students, showing all of the sounds and pictures at once can be very overwhelming. Therefore, lock pictures can be placed over the cards and taken off as you teach each sound. If you do not wish to use lock pictures, another option is to simply turn the cards over so students can not see them and then flip them right side up as each sound is taught.
It builds excitement for the students (they can’t wait to see what is under each one!) and makes it more interactive and meaningful for them since you are building (revealing) it together.
Here is an example of what it may look like with the lock pictures:

I like to build even more excitement by having 2 real keys hanging by the sound wall that we use to “unlock” each sound. Students love it!

Introduce the sound first by unlocking or revealing the mouth card.


Say the sound OR say words with the sound and see if students can tell you the new sound. For example, you can say something like “Let’s see if you can tell me the new sound for our sound wall lesson today. Tell me the first sound you hear in nest, nut, nail, neck.”.
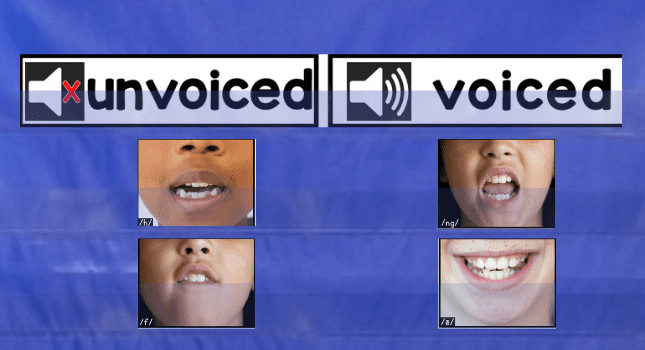
Describe what your tongue, lips, and teeth are doing when saying the sound as well as the airflow and if the sound is voiced or unvoiced (place your hand on your throat to feel if it vibrates).
It is important to explicitly teach and call attention to the mouth movements for each phoneme (sound) as it helps anchor each phoneme into memory and it helps students distinguish between letters that look alike or sound similar.
Have students make the sound while looking in their mirrors. Call attention to the placement of their lips, tongue, and teeth while making the sound. Show them the mouth card and help them produce the sound.
Ask questions such as:
- Is your tongue high, low, or pulled back?
- Feel your throat. Is your voice box on or off?
- Is anything blocking the airflow (lips, tongue, or teeth)?
- Is the airflow continuous or does it stop?
- When you make the sound, does the airflow come out of your mouth or nose?
- Are your lips open or closed?
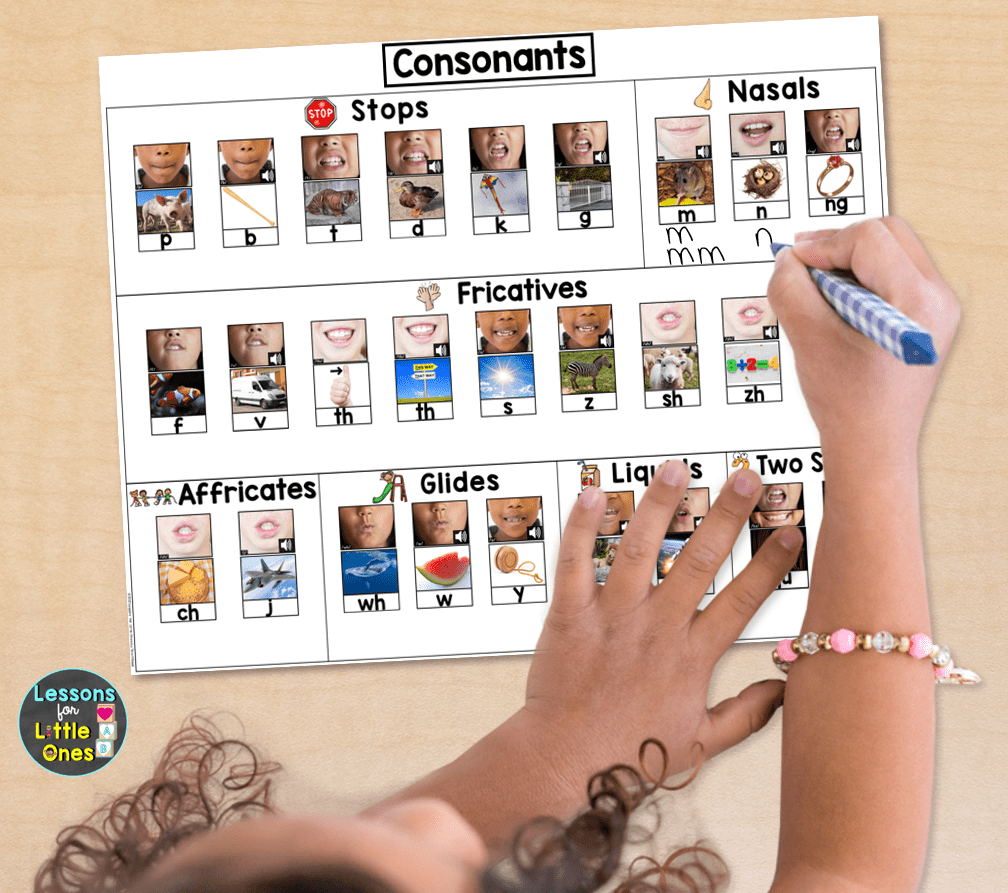
While it is not the main focus that young students know the categories of the consonant sounds, they can be introduced and explained in order to help them understand what is happening with their mouth, lips, tongue, and nose.
Here are some suggestions for helping students understand the consonant headings:
Stops – quick puff of air then stops, air stops immediately. Have students place their hands in front of their mouths when saying the sound to feel the puff of air (p,b,t,d,k,g)
Nasals – air flows through the nose. Have students hold their noses and try to make the sound (they can’t do it, they love this!). Have students gently place their pointer fingers on both sides of their noses (do not block the air), say the sound and feel the vibration. (m,n,ng)
Fricatives – friction in the air flow. These are also called windy sounds because you can keep saying the sound as long as you have breath (have students try it). (f,v,th,th,s,z,sh,zh,h)
Affricates – combination of fricative & stop, friction that is cut off, like a tug of war with sound in your mouth (pulling and then letting go). (ch,j)
Glides – they glide into the next sound (wh, w, y)
Liquids – air moves around in our mouth and goes everywhere, like water overflowing (l, r)
Two Sounds – 2 sounds combined (qu, x)
Using sound wall headings with picture clues can help students remember these attributes.


When introducing the sounds to young students, it is important not to accidentally add an “uh” or schwa sound at the end of consonants. Sometimes we do this unintentionally because we are stressing the sound to our young students. This YouTube video has the correct pronunciation for the 44 phonemes as well as the lip movements and is very helpful demonstrating the proper pronunciation.
This graphic shows the place of articulation for the consonant phonemes.

The vowel phonemes go from the front of the mouth to the back along the vowel valley. The vowel valley is arranged according to the shape the mouth makes when speaking the sound and where in the mouth the sound is produced. If you watch your chin in a mirror as you say the sounds in the first slope (ē, ĭ, ā, ĕ, ă, ī, ŏ) it will drop and then go back up as you say the vowel sounds in the upward slope (ŭ, aw, ō, oo, ū, yū).
Reveal and say the keyword picture. Ask students where in the word they hear the sound (beginning, middle, or end).


Say additional words that contain the sound and have students tell you where they hear the sound in each word (beginning, middle, or end).
Another fun option to get students up and moving is to have them place their hands on their heads if the sound is at the beginning of the word, place their hands on their hips if the sound is in the middle of the word, and touch their toes if the sound is at the end of the word.


Say words that contain and do not contain the sound and have students give you a thumbs up if they hear the sound in the word or a thumbs down if they do not hear the sound in the word.

Show students the spelling. Tell students that the sound /n/ (say sound) is represented in print by n (show the spelling).
Point to the spelling and have students say the sound.

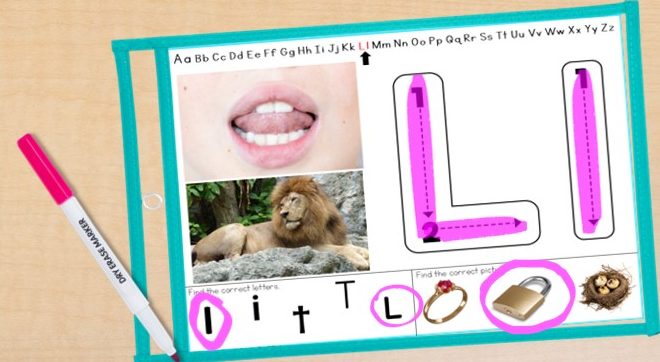
Next, show students the word. Say the name of the picture and point out where in the word the featured letter or spelling pattern is. Point to the featured letter or spelling and have students say the sound. Remind students that sounds (phonemes) make words.

If you are teaching both the uppercase and lowercase versions of the letters, show both versions of the letter. Explain that the sound is represented in print by (show the letters). Point out the difference between the uppercase and lowercase letters. Point to each letter and have students say the sound.

A little side note: I learned this tip in a training and immediately began doing it! Since the letters “a” and “g” can look quite differently in printed materials such as books than the handwritten version, it was suggested to introduce students to the “printed” form of each letter. I have since added this to the alphabet cards I use.

Show and say the proper letter formation for each letter followed by the letter sound. Then, have students air write each letter and say the sound when they are finished.
Doing the muscle movements and writing the letters leaves a muscle memory in the sensorimotor part of the brain which helps us recognize letters. It also helps children better recognize the unique properties of each letter.


Students can write each grapheme (letter or letters) on their own personal sound walls as they are learned. They can then use them for reference whenever they are writing.
Review Suggestions
Here are a few suggestions for reviewing previously taught sounds.
- Show students letters (graphemes) and have them say the sound (phoneme).
- Have students look at your mouth as you say a sound and see if they can find it on the sound wall and tell you the spelling.
- Play “I hear with my little ear a sound that…”. Similar to I Spy but describe a sound. For example, “I hear with my little ear a sound that I can’t make if I hold my nose (this is a clue that it is a nasal sound), my lips are together and my tongue is down, my voice box is on, it is the beginning sound in mouse.” Answer is m. After a while you can have students give the clues.
- Say a sound and have students write the spelling.
- Sorting Activities: Say the sound and show the mouth card, students say the sound and tell you whether it is voiced or unvoiced. You can also do this using the keyword picture cards.

- Use clip cards to help build the sound (phoneme) – letter (grapheme) connections important for word recognition and decoding skills PLUS the fine motor skills important for handwriting.
Clip cards can be used with a variety of manipulatives making them perfect for fun practice throughout the year. Since it can take children hundreds of exposures for a letter to become fully automatic in memory, they are perfect as a hands-on, engaging way to encourage the process of orthographic mapping.


- Another option is to use play dough mats throughout the year to help build those important sound (phoneme) – letter (grapheme) connections. Young students love play dough plus it builds fine motor skills!

- Once students begin to blend sounds, spell a word with the mouth pictures and have students guess the word (mat).

Helpful Resources:
I hope these tips and suggestions have been useful. As stated above, I highly recommend attending professional development trainings and using additional resources to learn about science of reading best practices. Here are just a few suggestions:
Speech to Print book by Louisa Moats, Ed.D.
Mary Dahlgren: Retire Your Word Wall: How Sound Walls Support the Science of Reading (Podcast)
Mary Dahlgren: Sound Walls vs. Word Walls
Transitioning from Word Walls to Sound Walls
Hear Here! The Sound Wall and Its Connections to Speech-to-Print Instruction (Podcast)
Melissa and Lori Love Literacy Podcast (episodes 70 & 71)
Putting Sound Walls to Practice
If you are interested in using the sound wall resources from this post, click the links below. If you have any questions, please feel free to contact me at lessonsforlittleones@gmail.com.
Sound Wall resources used in this post:
Get the Sound Wall, Alphabet Cards, & Center Activities in a Money-Saving Bundle!

Sound Wall with Real Mouth Photos & Alphabet Cards Bundle Pack

“Great resource for my 1st grade classroom. Easy reference for students to look at when learning new sounds, writing, and reading. Makes learning new sounds fun with unlocking new sounds as the year goes on.” – Lauren C.
“Great resource! The sound wall is excellent, I love the photos. The alphabet cards can be used in a variety of ways. I’ve used them for handwriting centers, sound matching, letter matching, and more. Thank you for this beautifully created resource.” – Stacy M.
“I like the real mouth pictures and the little prep, just print and go. My students are always looking up to the sound wall to make the letter sounds.” – Carrie V.
“This is an excellent resource. Everything you need all in one place. I would highly recommend.” – Josie T.
“I love the real photos used for this resource. Also, thank you for adding an editable document so that we can add words. Great job! Thank you!” – Alissa K.
“Thank you for all of the detail and resources you put into this sound wall pack. It is very useful in my intervention groups. Thanks!” – Alainna P.
“These were perfect for my class. The real photos were great for helping my students remembering letter sounds, and it was helpful in their writing.” – Melissa S.
Pin it for later!