


Fall is one of my favorite seasons! I love the pretty fall leaves and the cooler “jeans & jacket” weather. Nature also gives us lots of great sensory experiences during the fall.
One of my favorite themes during the fall season is apples, not only because they are my favorite fruit (honeycrisp are just so good!) but also because we can do a lot of fun, engaging hands-on activities with them.
In this post I’m sharing the most popular apple science experiments and STEM activities (as well as a few crafts) that students have enjoyed over the years.
Since I now have iPads available, we have started using them to record our findings and observations. Not only do students find this more engaging but it also teaches them how to use technology as a tool. Since this was not always the case, I’ve included both the print and digital options used for each experiment. I have shared both the print and digital recording pages plus the step-by-step directions for the experiments at my TPT store – click here.
What’s Inside an Apple?
This is a great introductory activity to an apple unit. Prior to beginning, I set out different types of apples for students to observe and handle.
Then I ask them what they think is inside an apple. Oftentimes students will say things like “the part we can eat”, “the white part”, and seeds.
When they say “seeds” I then tell them that each apple has a shape that holds the seeds and ask if they know what shape it is and how many seeds they think it holds.
Students write and draw their guesses on the What’s Inside an Apple? page. For the Seesaw version, we used the Doodle and Text tools to record our predictions.


I then say that we are going to cut an apple open and find out what shape is inside. To see the shape, the apple has to be cut horizontally. The children then discover the star inside!


The seeds are then removed with a toothpick and we count them.

Students record the actual findings on their page. When using Seesaw, students are able to take actual photographs of the apple!


For an extension activity, cut open several more apples of various sizes and shapes to see if they are all the same. The star shape will be in each, but the number of seeds will vary.
The Parts of an Apple
When explaining the parts of an apple, I like to use word wall cards as visual aides. They help students learn the words and the the real photos enable them to relate what is on the card to what they are seeing in the experiments and activities.


I cut open a real apple and then explain each part and its function.
Afterwards, I place the apple parts in a sorting tray along with magnifying glasses and allow students to touch and observe them.

After their observations, students take a photo of the tray in Seesaw and label the parts using the words from the word bank or the apple parts word wall cards.

Parts of an Apple Craftivities
The following crafts are perfect for introducing and reviewing the parts of an apple.
Coffee Filter Apple Core Craft
Materials Needed:
Coffee filters
Glue
Watercolor paint
Paintbrush
Scissors
To prepare the craft, fold a coffee filter in half. Cut a semi-circle from the round side. You will have 2 leaf shaped pieces. Leave one for the leaf and cut the other one into a stem.


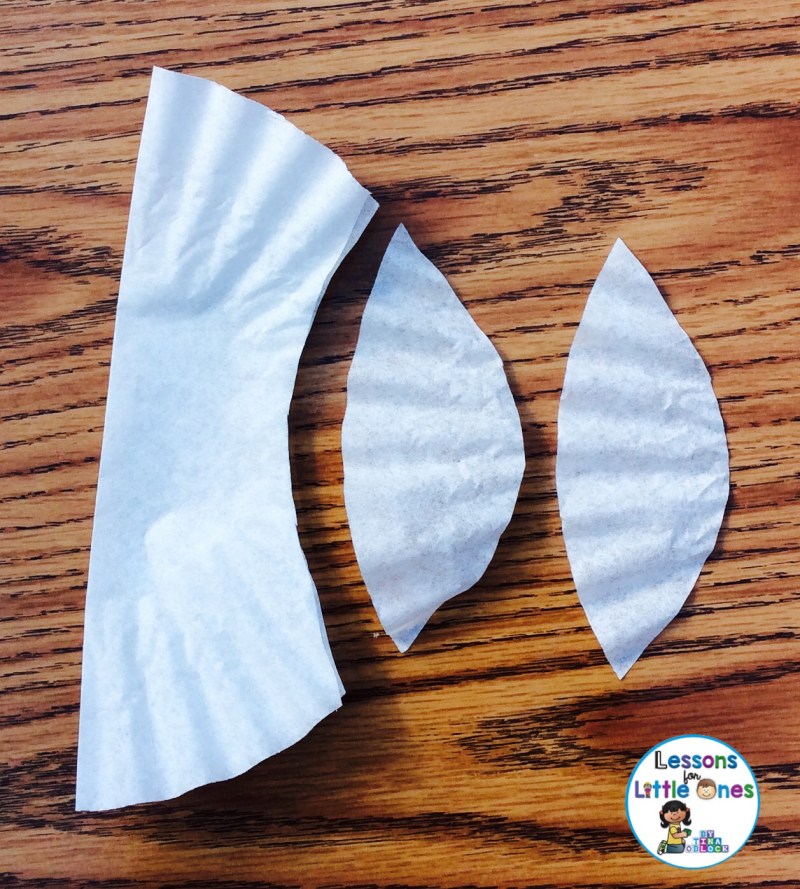


Students use the watercolors to paint the skin (red, green, or yellow), the leaf, the stem, and some seeds.


When dry, students glue the stem and leaf to the apple core.


A great way to extend the learning of this craft is to have students take photos of their crafts and label the parts of their apple using Seesaw.

Another option is to have students do a cut and paste activity.

Paper Plate Whole Apple Craft
Materials Needed:
Paper plates
Red, green, yellow, and white tissue paper
Real apple seeds OR black or brown tissue paper
Green and brown construction paper
Scissors
Watered down glue
Paintbrushes
To prepare this craft, cut the tissue paper into small squares.
Students glue the white tissue paper squares in the center of the paper plate to represent the flesh of the apple (dip the paintbrush in the watered down glue, paint some glue onto the plate, place the tissue squares on the glue).


Students glue red, green, or yellow tissue paper squares around the outside of the plate to represent the apple skin.


Students cut out a stem and leaf from construction paper and glue them on the plate.
Students then glue either real apple seeds to the center of the plate or crinkle up black or brown tissue paper to resemble seeds and glue them to the center of the plate.


You can also use Seesaw to take photos and label this craft similar to the craft above or do a cut and paste activity to check student understanding.


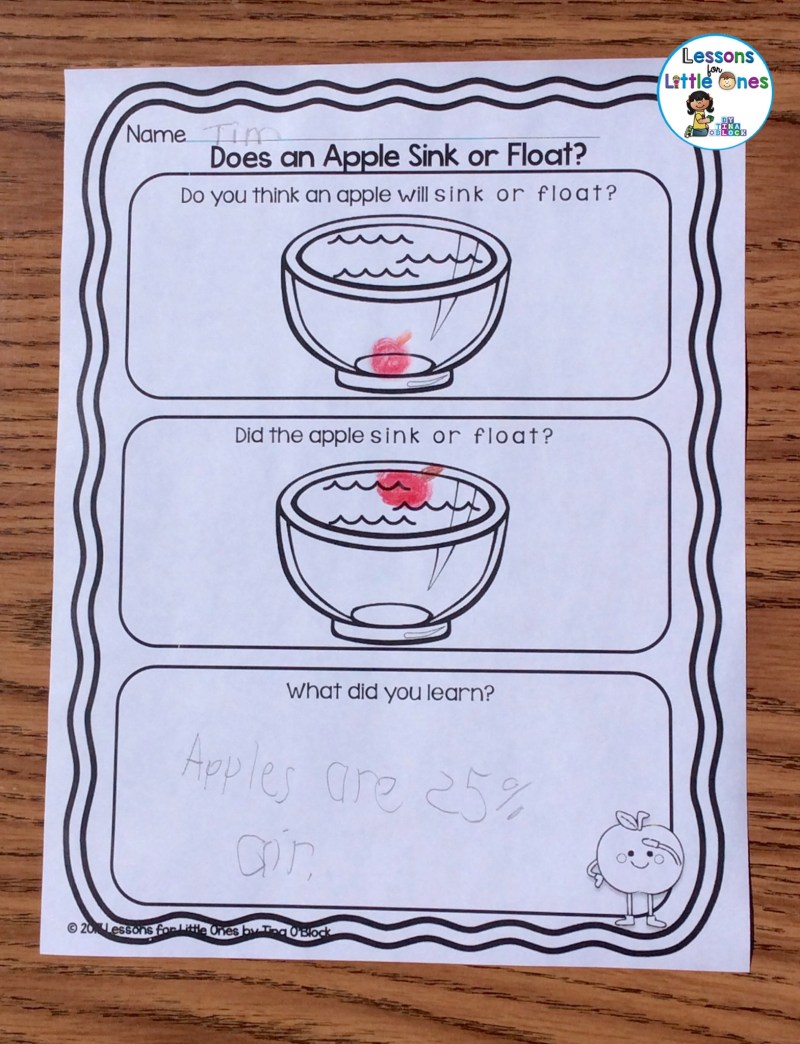
Sink or Float Apple Experiment
This is a simple experiment that students always enjoy doing. Pose the question – “Do you think an apple will sink or float in water?”.
Allow students to hold and handle a few apples prior to making their predictions. You can make a class graph of students’ predictions or students can record their individual prediction on a page.
I like providing a page with a bowl and having students draw the apple in the appropriate place. This helps them understand the difference between what it means to sink or float.


After students have recorded their predictions, place an apple in a bowl of water and see what happens (the apple should float).


You can also do this experiment with different color apples and have students predict what they think each color of apple will do – sink or float?
We recently did this using the Drawing tool in Seesaw.


After students have recorded their predictions, place each color of apple in the water and see what happens (they will all float).


Explain to students that apples float because they are approximately 25% air (they have air pockets) which makes them less dense than water.
I then have students draw what actually happened in the experiment and write what they learned.


Apple Boats STEM
In this activity students design and build apple sailboats and then test them to see if they will float.
Materials Needed:
Apples cut in half and quarters
Toothpicks
Construction paper
Copier paper
Scissors
Crayons (optional)
Tub of water
To prepare this activity cut some apples in half and some in quarters or smaller pieces. You will need enough for each student to have an apple piece for their boat.
You can choose to have students cut out their own sails from the paper OR if doing this activity with younger students you can choose to cut out some sails for them. Cut sails of different sizes and shapes.
You will also need a tub or container of water in which students can sail their apple boats.
Students cut out and design their sails from either the heavier construction paper or the lighter weight copier paper and draw their design and name on them.
Students use a toothpick to attach their sail to the apple bottom of their choice to create their apple boat.


Allow students to place their apple boats in the water to see if they will float. Students observe the boats and draw conclusions about the various boat bottoms and sails used.


When doing this STEM challenge I like to have students pre-plan and design their boats and reflect on what they learned after sailing them.


Seesaw can also be used. Students can use the Draw, Photos, and Text tools to complete the page.

Apple Tower STEM Challenge
The challenge is for students to build the tallest freestanding structure using apple pieces and toothpicks within the given time period.
Materials Needed:
Apples pieces
Toothpicks (flat toothpicks for younger students)
Tape measure
To prepare this activity cut some apples into small, square pieces. You will need approximately 2 cups for each team or student.
Students can complete this challenge in pairs, teams, or individually.
The object of the challenge is for each team or student to build the tallest freestanding structure on the surface of a table within the allotted time period of 5 minutes (time can be adjusted).
Give each team or student a pile of apple pieces and approximately 50-75 toothpicks.


On your signal students can begin constructing their apple towers.

When time is up, students must step away from their towers.
Measure each tower from the table top to the highest point.
The winner is the structure that stands the highest vertical point above the table.


After the challenge I have students reflect on what was easy, what was challenging, and what they learned. We have done both print versions and digital versions using Seesaw.


What Keeps an Apple From Turning Brown? Experiment
During this experiment students will discover what substance will keep an apple from turning brown.
Materials Needed:
Apples pieces
Small bowls or containers
Vinegar
Baking soda
Milk
Water
Lemon juice
Before beginning the experiment ask students if they know why apples turn brown. Explain that browning occurs because of a chemical reaction between oxygen and an enzyme in the apples (oxidation). Oxidation happens when you expose the inside (flesh) of an apple to air. Another type of oxidation that students may have seen is rust (when metal comes in contact with oxygen).
Tell students that there are certain substances that can help keep an apple from browning. They are going to test some to see which one works the best.
Prior to beginning the experiment, have students guess which substance they think will work the best and write their predictions on a chart or on a recording page.


Cut an apple into 6 pieces. Place a piece of apple in each container and cover it with a substance (water, milk, baking soda, vinegar, lemon juice). Leave one apple piece with nothing on it (the control). Label the containers. Let sit for several hours.


After several hours allow students to observe the results. All of the apple pieces should show some form of browning except for the lemon juice.
Explain that the lemon juice has ascorbic acid (vitamin C) and the oxygen reacted with it first before reacting with the enzymes in the apple. If the ascorbic acid in the lemon juice would get used up, then the oxygen would begin to react with the enzymes in the apple and browning would occur.


I like to have students record the outcome of the experiment by coloring pictures of apple slices to resemble the results and then writing which substance worked best.


We have also recorded results using Pic Collage and taking actual photos of each container.


Jumping Apple Seeds Experiment
I love watching students’ reactions to this experiment!
Materials Needed:
Apple seeds
Clear glass
Water
Baking soda
Lemon juice
Measuring spoons
Prior to beginning the experiment explain to students that you are going to put apple seeds in a glass of water with baking soda and lemon juice.
Have students predict what they think will happen. I like giving them multiple choices from which to choose.


Add about 2/3 teaspoon baking soda to the glass. Add ½ cup water.
Drop apple seeds into the mixture.


Add a tablespoon of lemon juice and stir the mixture.


The mixture will begin to bubble and the apple seeds will “jump” up and down!


You can watch a video of the jumping apple seeds here:

We take photos in Seesaw of the seeds jumping up and down (they can also draw or write about what happened).


Apple Volcano
This is a fun experiment that students love to watch!
Materials Needed:
Apples
Vinegar
Baking soda
Pan or baking sheet
Food coloring (optional)
Apple pie spice (optional)
Cut a hole in the top of an apple.


Add some baking soda to the hole in the apple. Optional: You can mix apple pie spice to the baking soda if you want a pie smell.


Add food coloring to the vinegar if desired


Place the apple in a pan or baking sheet to catch the lava overflow.
Pour the vinegar on the baking soda inside the apple and watch it erupt!


The Science Behind It:
The vinegar (acid) reacts with the baking soda (base) causing carbon dioxide bubbles. As the carbon dioxide bubbles rise up they bring some of the mixture with them causing it to “explode” or “erupt”.
If you would like to use the apple science experiments printable pages with your students they are available here along with more detailed step by step directions with photos, coordinating recording pages, and technology integration options.


What other educators are saying about Apple Science & STEM:
“Lots of great apple activities! One of the best purchases of the year so far. Thanks” – CCR
“My first graders couldn’t wait until we had science everyday! They really enjoyed all the activities with the apples (especially tasting the different kinds) and really were interested in how all the other students made their apple boats. ” – Michelle F.
“I wish I could give more than 5 stars! This a GREAT resource for my students. At the end of the year many students mentioned the activities in this resource as their best memory. Great resource!!” – Jessica W.
“This is a great resource with several meaningful, engaging activities. This is the best apple resource I own, and my students love the activities!” – Charlene E.
“This packet is so thorough and provides so many incredible opportunities. I love that it’s using apples (fall themed) and that my virtual families can easily access the materials so that they can still get hands on labs at home. Thank you for putting so much thought and care into this!” – Sarah R.
Have engaging science experiments and STEM activities throughout the entire school year with this money-saving Science & STEM Bundle!
