Grow Your Own Pumpkin and/or Use Real Photos
Real life and hands-on experiences are some of the best ways to teach concepts, therefore growing your own pumpkins and documenting each stage is a great way for students to learn and remember the life cycle of a pumpkin because they actually experience it and help grow the pumpkins.
However, growing your own pumpkins takes several months and you may not have the time or resources to do it. Therefore, using real, full-color photographs instead of clip art to show and explain the stages of the pumpkin life cycle is the next best thing because students can relate real photos to the real world easier than clip art or drawn illustrations.
Growing Your Own Pumpkins
If you choose to grow your own pumpkins, here are several tips I have learned.
- When choosing seeds from a pumpkin to plant, choose the largest seeds because they have the best chance to germinate. Save 3 times more pumpkin seeds than the number of plants you want to grow.
- Rinse them under water to clean off all of the pulp.
- Lay them out on a paper towel to dry. Keep them in a cool, dry spot for 1 week.
- Place the dry seeds in an envelope and store in a cool, dry spot until you are ready to plant them. They can be stored in the refrigerator (put the envelope in a container, poke holes in the top of the container, place in the back of the refrigerator).
- It is recommended that pumpkins be planted directly in the ground, however I have started them indoors so students can observe the plant grow and then transplanted them outdoors once the soil is 70 degrees and the last frost is over.
- The soil needs to be 70 degrees or warmer for planting and they need to be in a sunny area. We kept ours indoors by a sunny window until May then transplanted it outdoors in full sun.
- It is best to water a pumpkin in the morning. Pumpkin plants retain a lot of water so they may not need watered every day.
- If starting the plant indoors, it will produce flowers but only male flowers which do not turn into pumpkins. In order for the plant to produce female flowers, the male flowers need to be pollinated by bees. Our indoor plants produced a lot of flowers that would last about a day then die. It wasn’t until we transplanted it outdoors and had bees visit the plant that we finally saw female flowers that turned into pumpkins. In other words, the plant will eventually have to be transplanted outdoors in order for it to produce pumpkins.
- When you transplant it outdoors, give it a lot of water for the first week. It may not do well right away, but should start to perk up in a week or so.
Here are a few pictures from when we grew our own pumpkins.


Students really enjoy this experience! I make watering and checking the pumpkin plant one of the daily student jobs. We document and record any changes in our science journals and online on our class website.
Use Real, Full-Color Photographs
As I stated above, I feel it is very important when discussing the life cycle of a pumpkin plant to use real photographs instead of clip art images so that young students can better relate them to the real world.
When introducing or reviewing the pumpkin life cycle I use a PowerPoint presentation because it holds student interest and I can include some of our own photos as well as animations.
It allows me to show the pumpkin life cycle from start to finish since growing our own spanned several months and began in the spring and ended in the fall spanning 2 school terms.
I use a combination of the photos we took during our own pumpkin growing experience and stock photographs.
Each stage is explained use simple terms that young students can understand along with a few animations to keep their interest. Here are a few example slides:

Use Interactive Resources, Games, Craft, & Printables
Young students love resources with which they can interact. Videos, games, etc. are all ways to keep them engaged and involved. I wanted a fun and interesting way to check their comprehension of the pumpkin life cycle so I created an interactive quiz at the end of the PowerPoint presentation in which they have to choose the missing picture in a sequence of pumpkin life cycle stages as well as free self-checking Boom Cards.
If they choose the correct picture, it moves to the correct location in the sequence and a happy pumpkin face is shown. If they choose and incorrect picture, and “Oh no! Try again!” pumpkin face is shown.
Students can answer in several ways: they can raise their hands and take turns coming up and clicking on the answer, they can hold up 1,2, or 3 fingers to represent their choice or they can use dry erase boards and write their answer (1,2, or 3) and hold it up for me to view.
I also created free interactive, self-checking Boom Cards and Google Slides that the students can complete on the iPads, laptops, or whiteboard. They are an engaging way for the students to review the stages in the pumpkin life cycle and something that they can do independently.


Classroom Visuals: Poster, Word Wall & Pocket Chart Cards
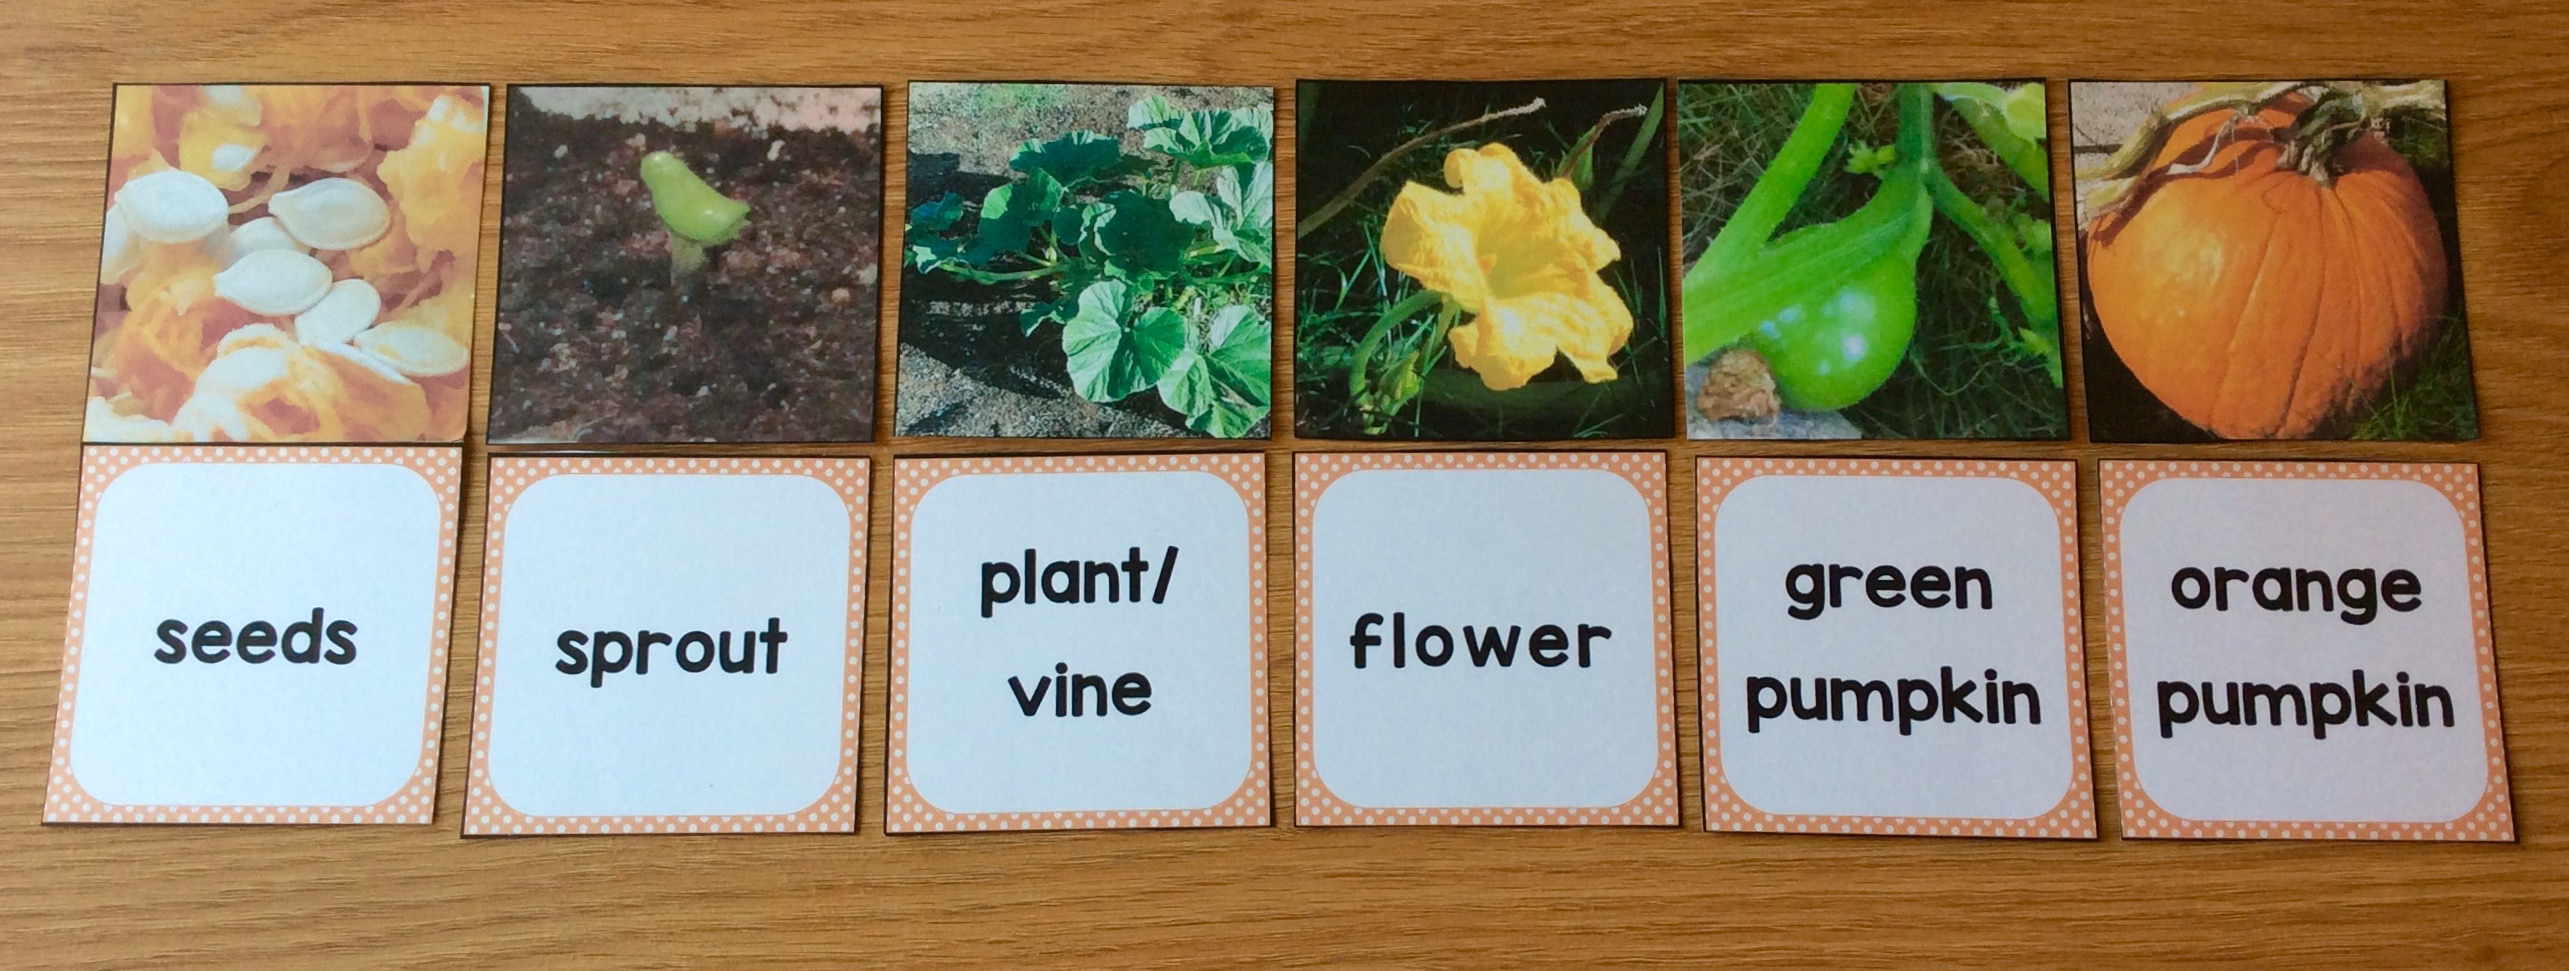
To help children learn the sequence of the stages as well as the vocabulary, I like to use classroom visuals. I place the word wall cards in our writing area and the poster in our science center area.


Students enjoy putting the pumpkin life cycle cards in the correct order in our pocket chart and then matching them with the correct vocabulary card.

Center or Small Group Activities
I also use the pumpkin life cycle sequencing and vocabulary cards during small groups and centers.
We also bind them together for a class book or reader.

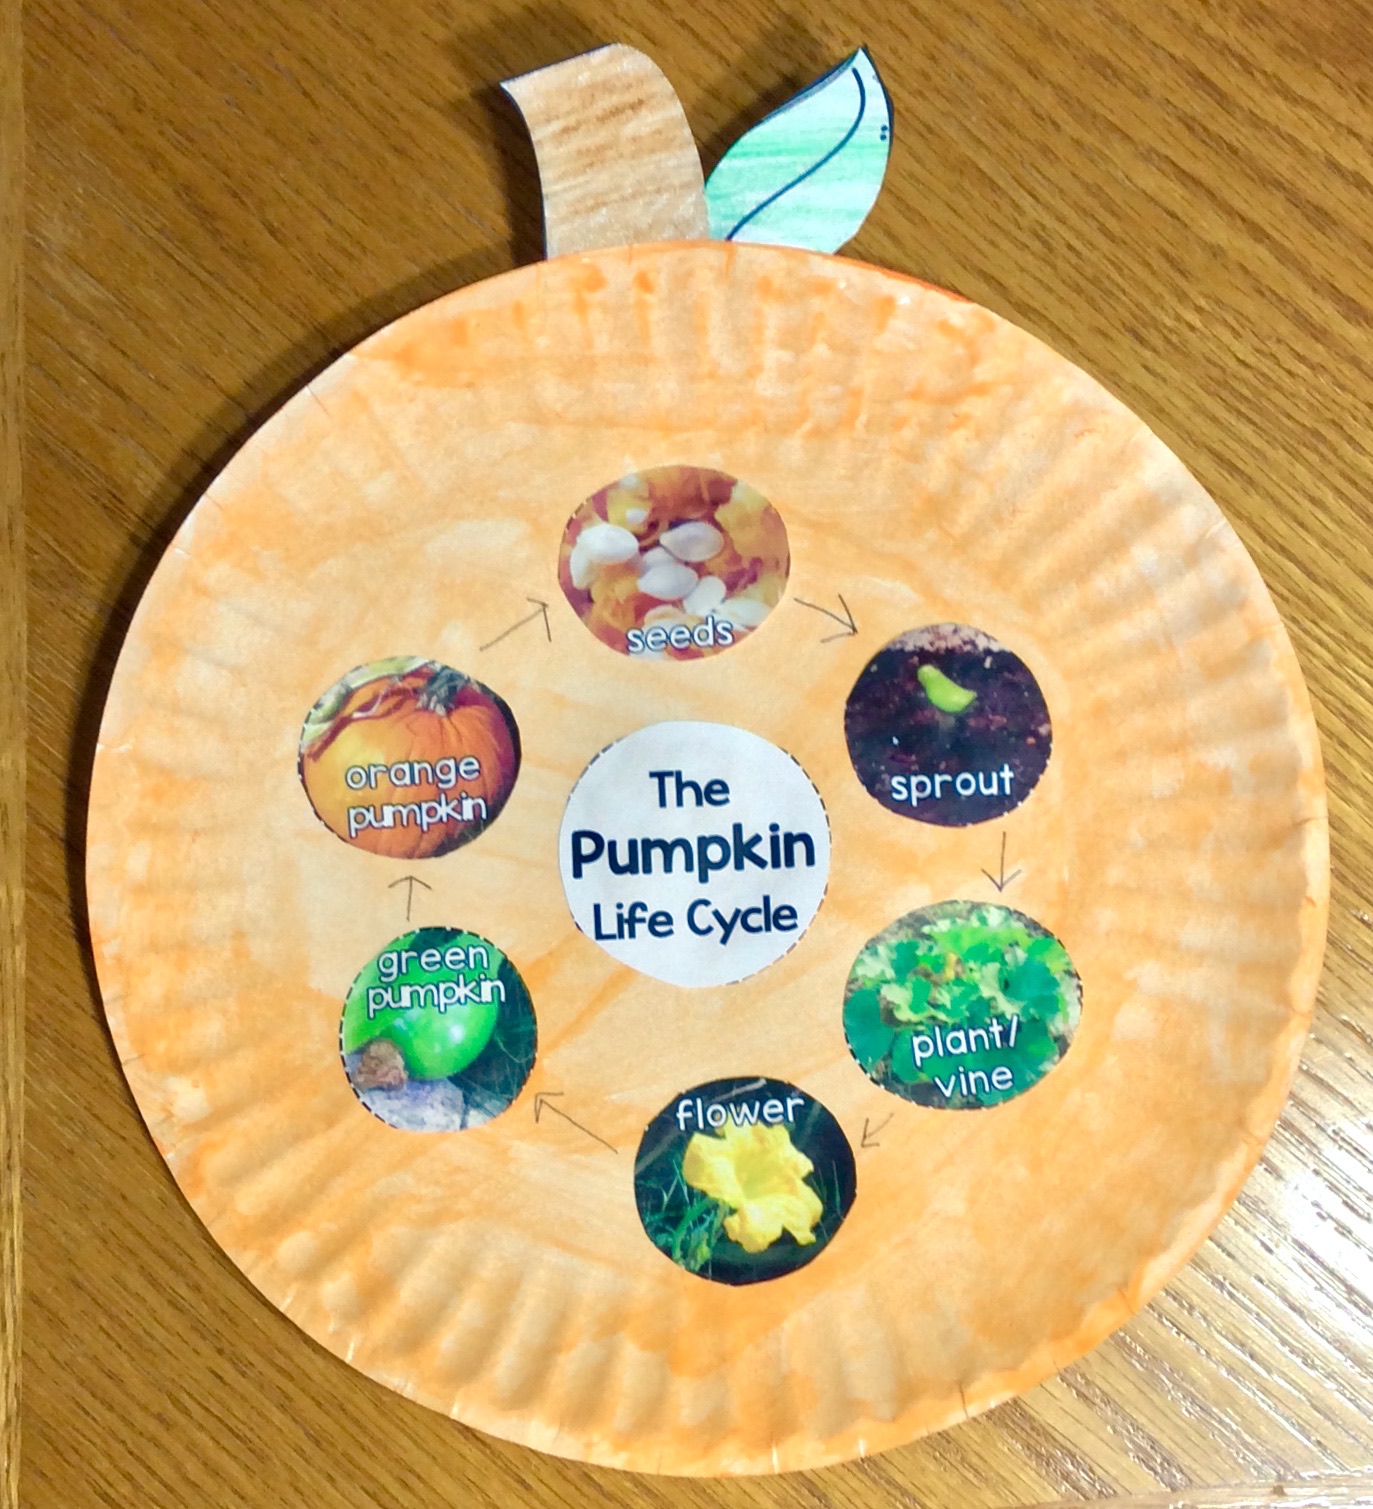
Pumpkin Life Cycle Craft
I love this craft because it gives students a creative visual of the pumpkin life cycle stages and requires them to put the stages in order.
Paint or color a paper plate orange.
Have students glue the pumpkin life cycle pictures in the correct order in the center (I provide my students with a printable page to cut out).

Cut & Paste Pumpkin Life Cycle
To check my students’ understanding of the pumpkin life cycle, I have them do this fun cut and paste activity that requires them to put the stages in the correct sequence.

Pumpkin Life Cycle Card Games
We all know how much students love games so I teach students a variety of card games using the pumpkin life cycle cards. It is such a fun way for them to review and reinforce the pumpkin life cycle stages!
Memory – Lay the cards face down in rows. Students turn over 2 cards, if they are a match they keep the cards and go again. If they do not match, they turn them back over and it is the next player’s turn. The player with the most matches at the end wins.

Go Fish – We play this classic card game several ways. A pair can consist of matching card to card or matching a vocabulary card with a picture card (since young children have a hard time holding cards, we put them in pool noodles that are cut in half with a slit down the center).

War or Top It – We play this game with 2 players facing each other. Players divide all the cards and place their cards face down in front of them in a pile.
Each player turns up a card at the same time. The player with the picture of the furthest stage in the pumpkin life cycle takes both cards and puts them face down on the bottom of their stack. In the example picture the winner would be the player that put down the orange pumpkin card.
If players turn up the same card, both players then put one card face down and one card face up. The player with the furthest card in the pumpkin life cycle wins all 6 cards.
Play continues until one player is out of cards or until time allows.

Pumpkin Gin Rummy – We play this similar to the classic card game except the object of the game is to get all 6 stages of the pumpkin life cycle and put them in order for “gin”.

Pumpkin Poker – Each player gets 6 cards. The remaining cards are placed face down in a scattered pile in the center.
The object of the game is to get the winning poker hand which is all 6 stages of the pumpkin life cycle put in the correct order.
On each player’s turn they can decide to discard 1,2, or 3 unwanted cards. They place the unwanted cards face down, not showing them to the other players. They then draw the same number of new cards from the pile in the middle. After drawing their new cards, they mix their unwanted cards into the face down pile in the middle and play goes to the next player. Play continues until a player gets “pumpkin life cycle poker” which is all 6 stages of the life cycle and puts them in the correct order.

How do you teach the pumpkin life cycle? I would love to read your ideas in the comments!
If you would like to use the Pumpkin Life Cycle activities from this post with your students you can find them in this money-saving bundle pack.
If you would like to use the PowerPoint and Interactive Quiz in your classroom it is available here.

You can also watch a short 1 minute video preview below:
If you would like the printables for your classroom (pumpkin life cycle word wall cards, poster, cards, craft, cut & paste pages) they are available here.
If you would like Pumpkin Science & STEM Activities PLUS the Pumpkin Life Cycle Activities they are available at a discounted price here.