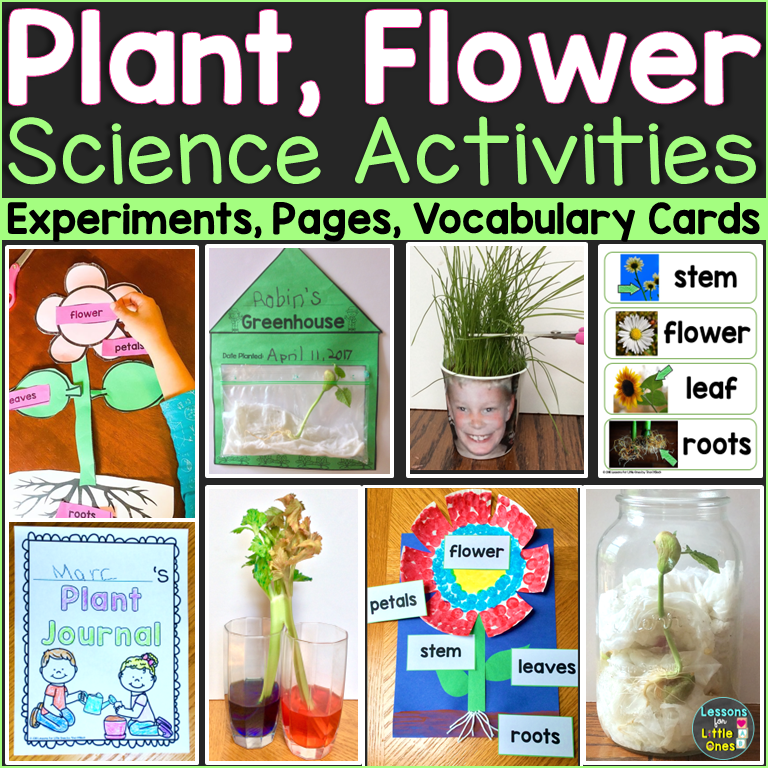
I love doing plant experiments and sprouting seeds with young children in the spring. Not only do they get excited to see how plants grow but planting seeds also teaches them patience and how to wait for gratification which is very important in this fast-paced, instant gratification world in which we now live. In this post I’m sharing some of my favorites from over the years.
What Liquid is Best for Growing Seeds? Experiment
This experiment tests what type of liquid is best for growing seeds and can be done using a wide variety of liquids. Since we already discussed that plants need water to grow, we first tested different types of water to see if it made a difference. We decided to test tap water, bottled water, sugar water (1 cup of water with 1 Tbsp sugar), and salt water (1 cup water with 1 Tbsp salt). I used grass seed for this experiment because it sprouts fairly quickly but you can use bean seeds (lima beans soaked overnight in water work well) or any other type of seed you wish.
We added the same amount of soil and seed to each cup and labeled them. We then measured out the same amount of water for each cup and watered the seeds with the different types of water and set them by the window. Students make predictions as to which one they feel will work best.

We observed the seeds for 5 days and were a little surprised that the bottled water didn’t grow as well as the tap water. The tap water grew the best, followed by the bottled water, the sugar water had a few blades come up, and the salt water did not have any.

When looking at the label of the bottled water we found that additional ingredients are added (calcium chloride, sodium bicarbonate, and magnesium sulfate) which most likely lead to mineral imbalances in the soil that slowed growth. Liquids with very high sugar or salt levels can actually pull water away from the plant or seed rather than allowing the water to be absorbed. In conclusion, simple pure tap water worked best.
We then do the experiment with liquids other than water to see if another type of liquid could be used if water isn’t available. You can use any liquids you have on hand, just make sure that one of them is water to use as the comparison. We have tried vinegar, oil, rubbing alcohol, lemon juice. As expected, water always works best. Last year students had the idea to test liquids that we drink to see if plants would drink them too. I thought this was very creative! We tested vitamin water, pop (soda), and juice.
We added the same amount of soil and seed to each cup and labeled them. We then measured out the same amount of liquid for each cup and watered the seeds with the different types of liquids and set them by the window. Students made predictions as to which liquid they feel would work best.

We observed them for a week. Our results were that water was best, followed by the vitamin water. Neither the juice or pop had any sprouts.
Using liquids that are very acidic or very alkaline lead to mineral imbalances in the soil that will kill plants or slow growth. Liquids with very high sugar or salt levels can actually pull water away from the plant or seed rather than allowing the water to be absorbed.
I have students record their results.

How Plants Drink Science Experiment
This experiment has been around for years and is a great way to demonstrate to students how plants get water from their roots all the way up to their leaves.
It is very simple to set up. Celery stalks that have leaves at the top work best. The stalks on the inside of the bundle of celery usually have the most leaves.
Cut about an inch or so off the bottom of the celery stalks.
Fill each container about halfway with water and drop 10-15 drops of food coloring in each glass. Place the celery stalks in the water.

I also like to do a split stalk one. Cut one stalk in half part way up and place one half in one color and the other in a different color.

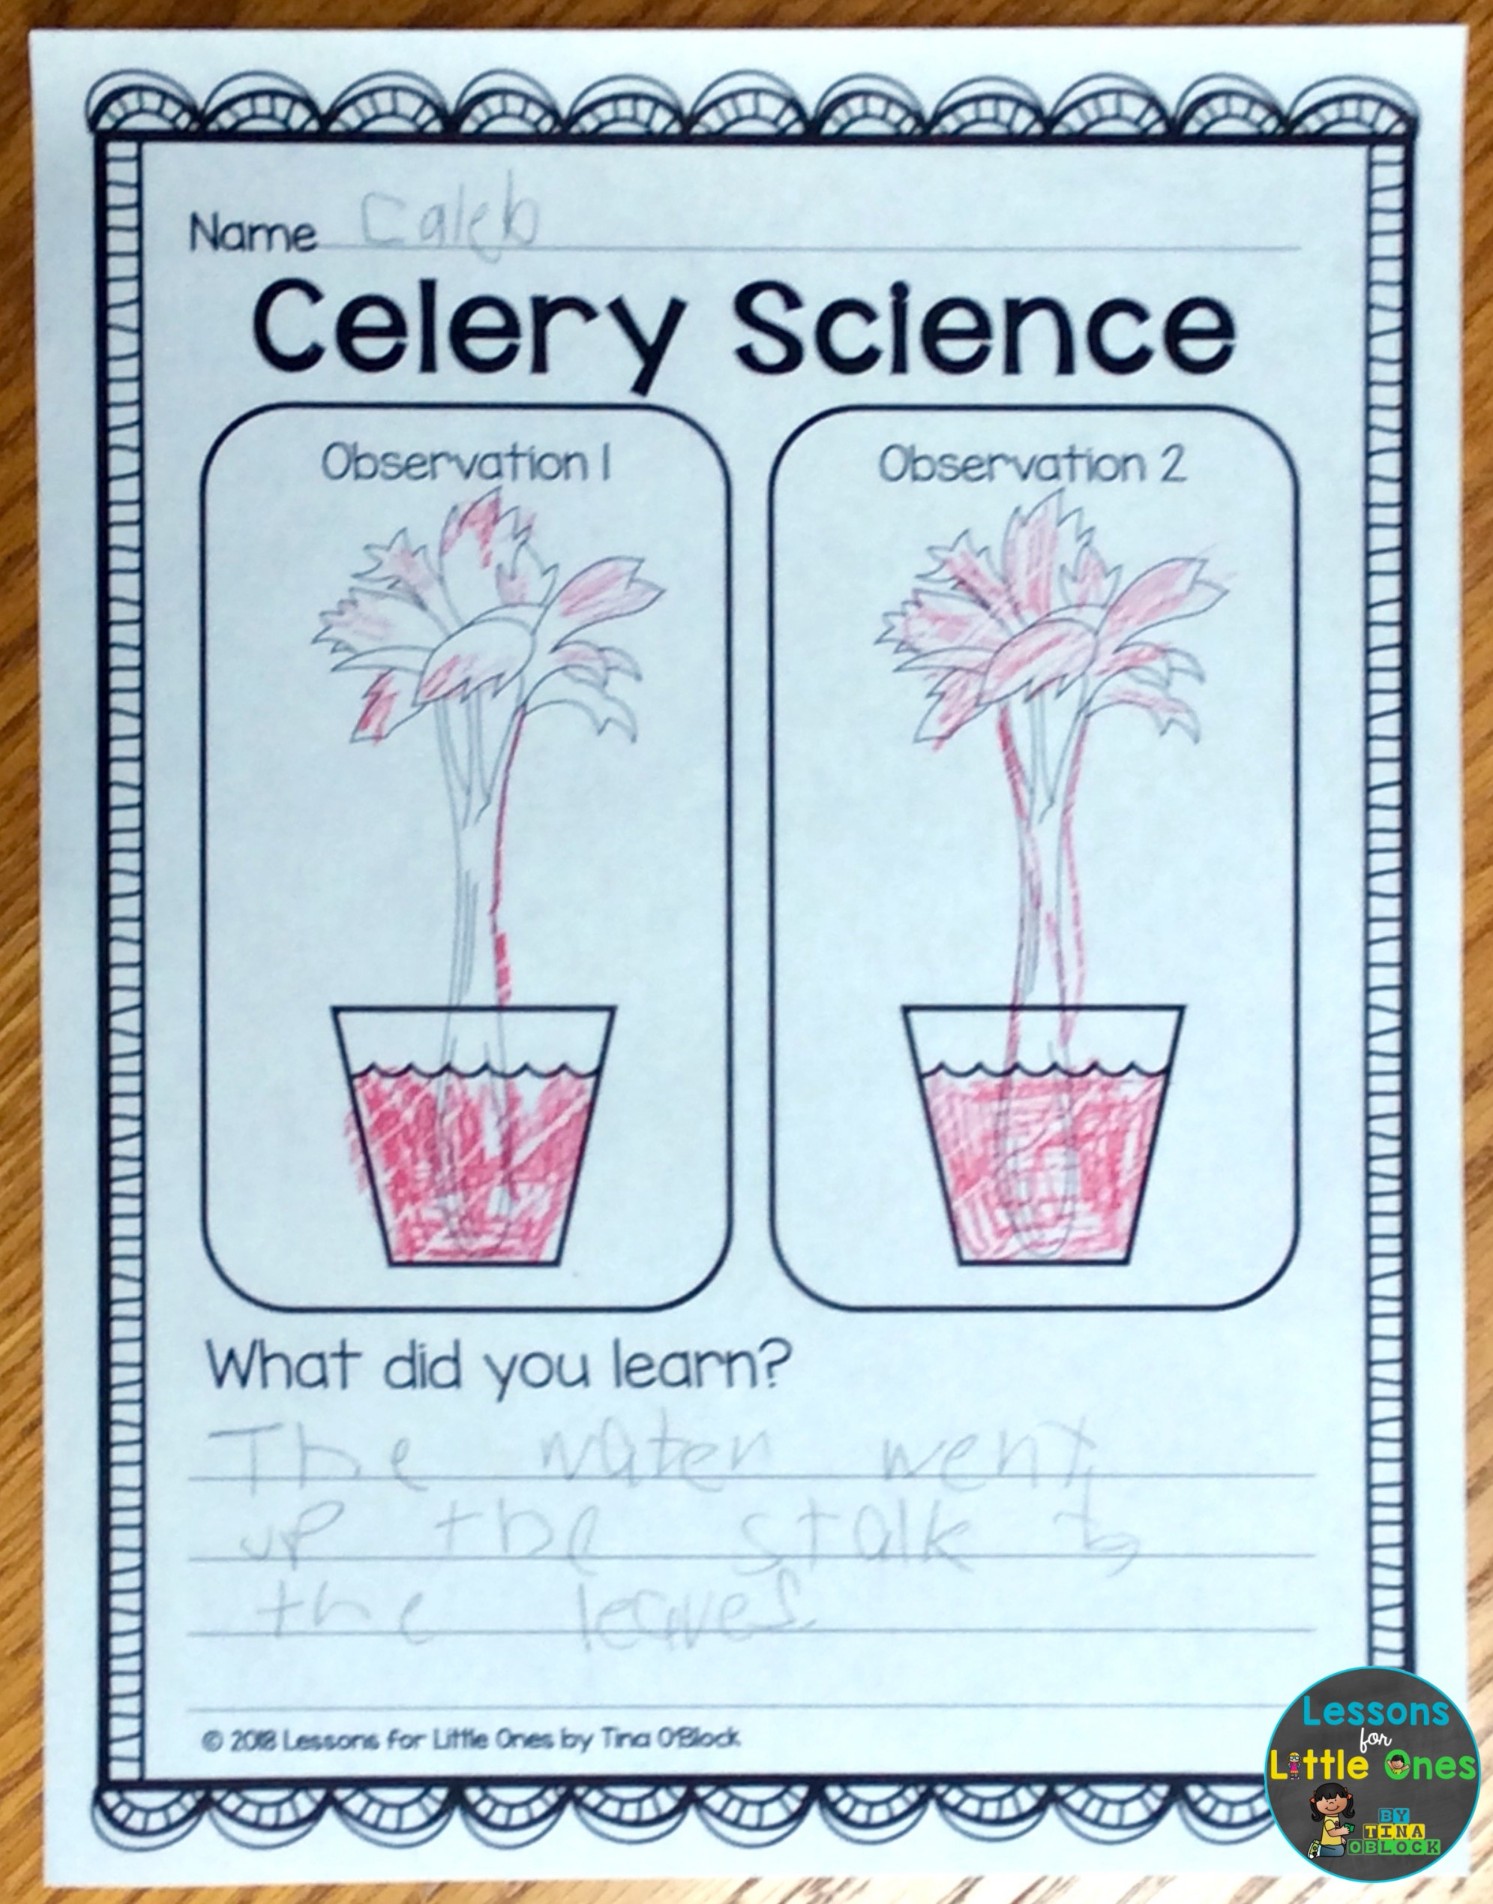
Observe the celery at the end of the school day. You may see a little color in the stalk or the leaves. Observe them again the next day and you should see color in the leaves. After 48 hours you will really notice changes and color in the stalks and leaves showing that the water traveled up through the stalk to the leaves.


The split celery stalk should show the separate colors on each side and then a mix of the colors in the leaves in the middle. In the pictures below the blue is on the left, red on the right, and some purple leaves in the center.


You can cut open the stalks to allow students to see the small tubes inside the stalks that carried up the colored water to the leaves.
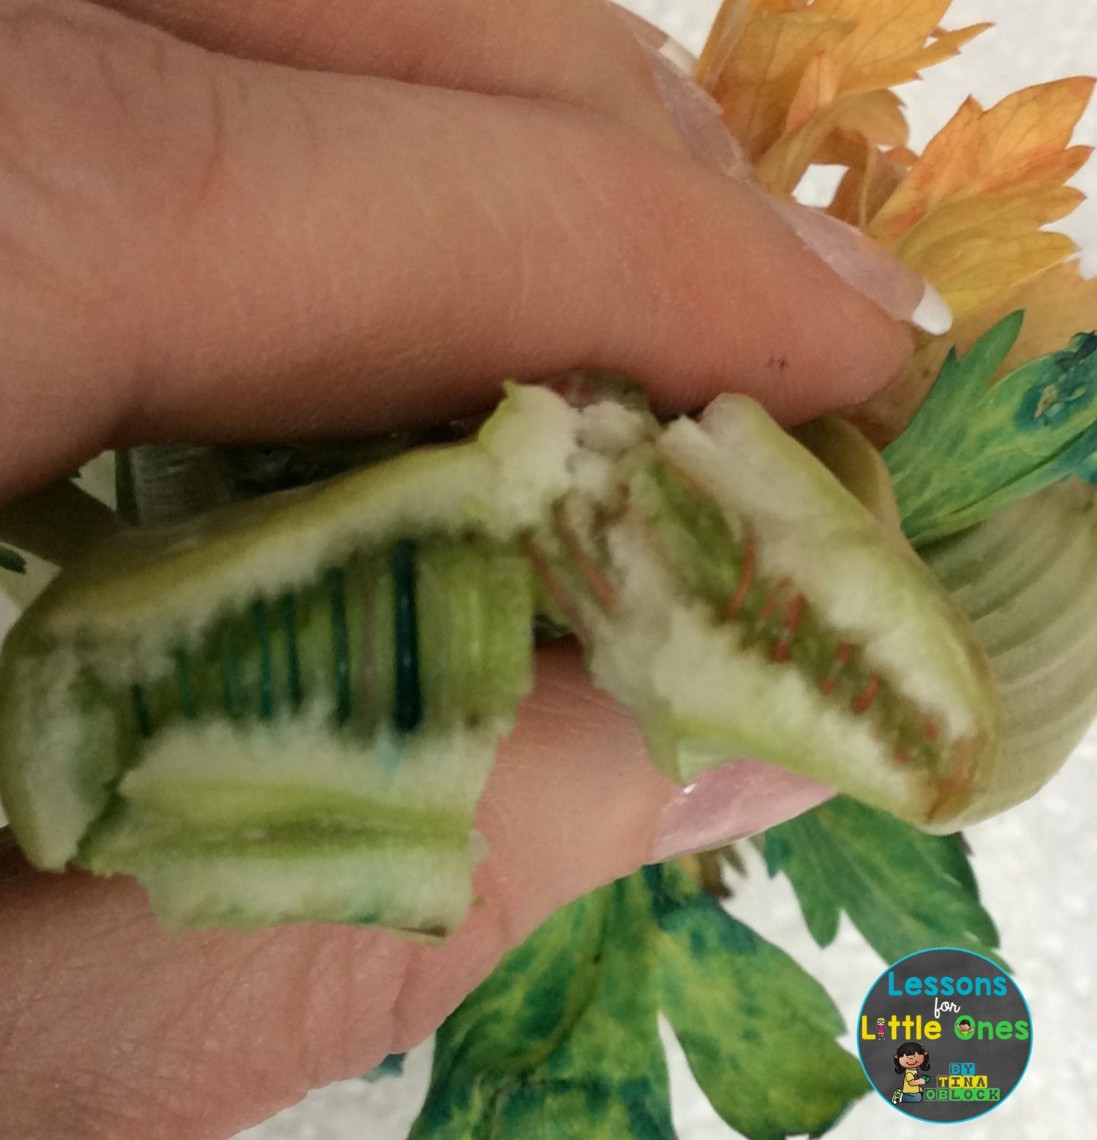


After cutting open the celery we discuss the results. I introduce some bigger vocabulary to them when we talk about the science behind the experiment, but I basically just want them to understand that the water travels up the stem through tiny tubes to the leaves. Here is a simple explanation:
The Science Behind It:
This experiment demonstrates how plants use capillary action to draw water up their stems. Capillary action is the process in which a liquid, like water, moves up something solid, like the tubes (xylem) in the stem. The leaves help pull the water up the xylem through transpiration. The leaves have little holes that let out the water that the plant is done using. This makes room for more water to come rushing up through the stem.
I have students record their observations by coloring the celery on their recording page (I created pages with the celery already drawn to make it easier for my young students). Then they write what they learned along the bottom.
Do Plants Need Light? Experiment
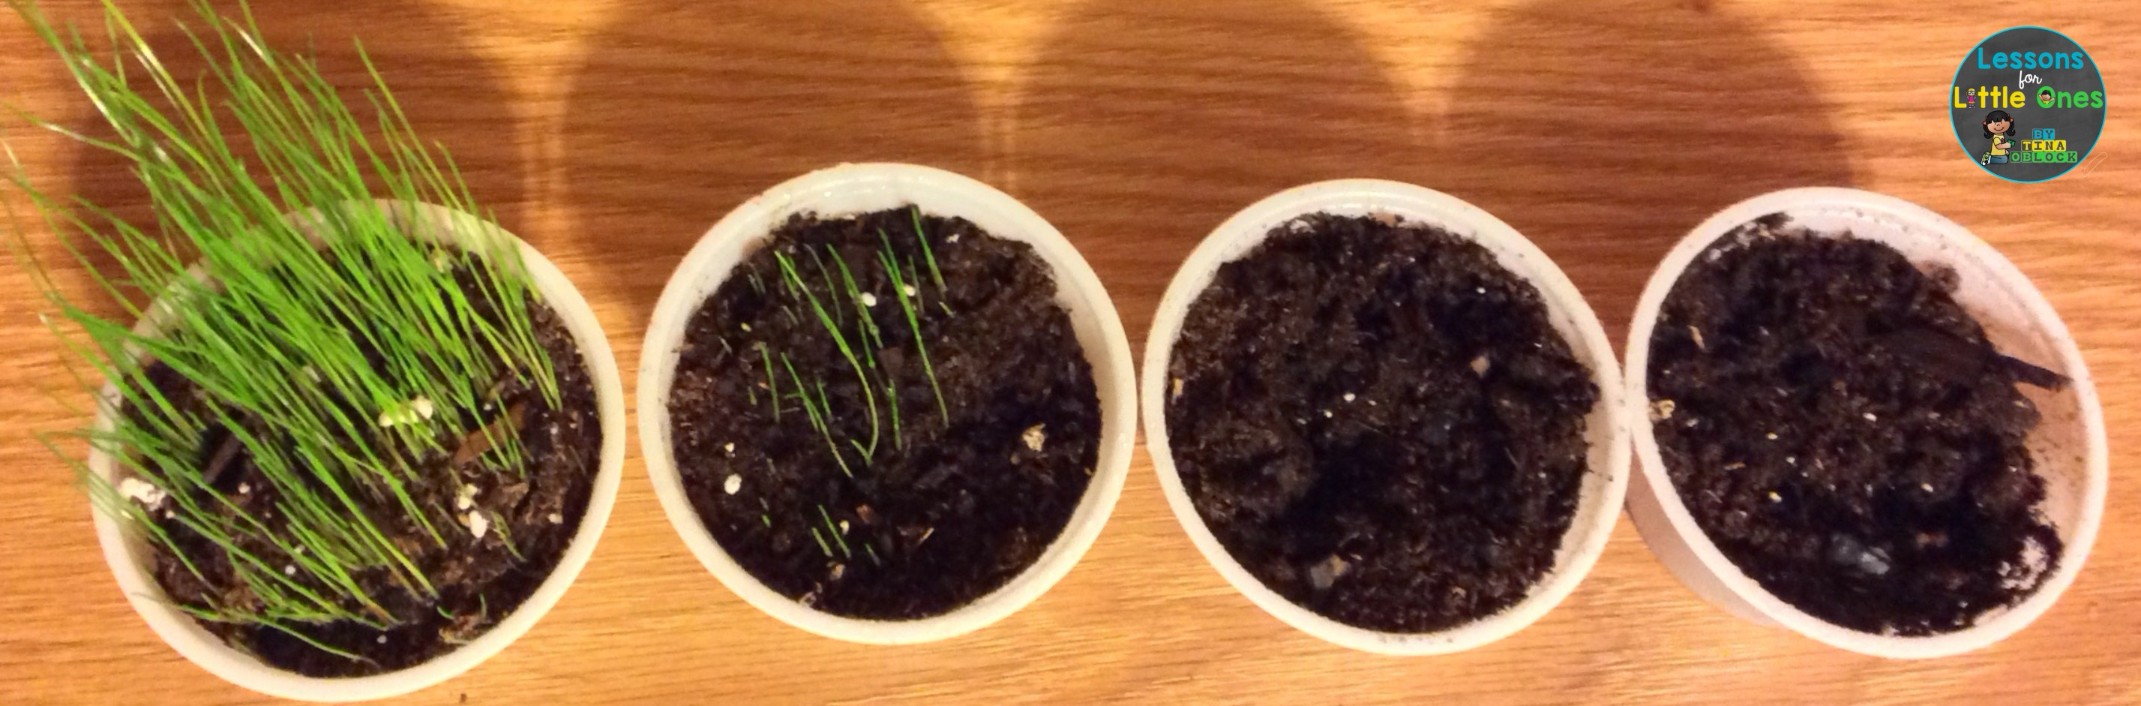
This experiment tests whether plants need light to grow. You can choose to plant 2 containers of seeds and set one in direct sunlight near a window and one in complete darkness OR plant 3 containers and set one in complete sunlight near a window, one in partial light, and one in complete darkness (it is important that there is NO light).
Plant the same number of seeds in each container with the same amount of soil and label each container.
Have students help you decide the best places in the room to place each container (by a sunny window, in a closet that gets NO light, in a file cabinet drawer, on a shelf in partial light, inside a closed box, etc.)
Observe the containers for about 2 weeks (or however long it takes to see growth) watering as needed. At the end of the experiment, put the containers side by side and discuss the results.
We do 3 containers – one by the window in full sunlight, one on a shelf that gets partial light, and one in the back of the closet behind a box.
The one near the window shows the most growth, the one in the partial light has growth on the side of the container that received partial light and grows towards the light, the container in total darkness has no growth.


The Science Behind It:
Plants need light to grow because it is an important part of photosynthesis, the process plants use to convert carbon dioxide and water into food. Without light, photosynthesis does not work properly and therefore the plant does not get enough food. However, not all plants need the same amount of sunlight. There are types of plants that need a lot of bright sunshine and some that can survive with only a little light, but in the absence of ALL light plants will not survive. If you had a seed sprout in the dark, it may have used energy stored up in the seed to begin growing but it will not continue to grow without light.
I have students record their results on recording pages.

Growing Grass Science Activity
Growing grass is a great activity to do with young children because it is easy to plant and grows fairly quickly. It also teaches them about the needs of plants and develops patience because they have to wait for the results and observe changes over time.
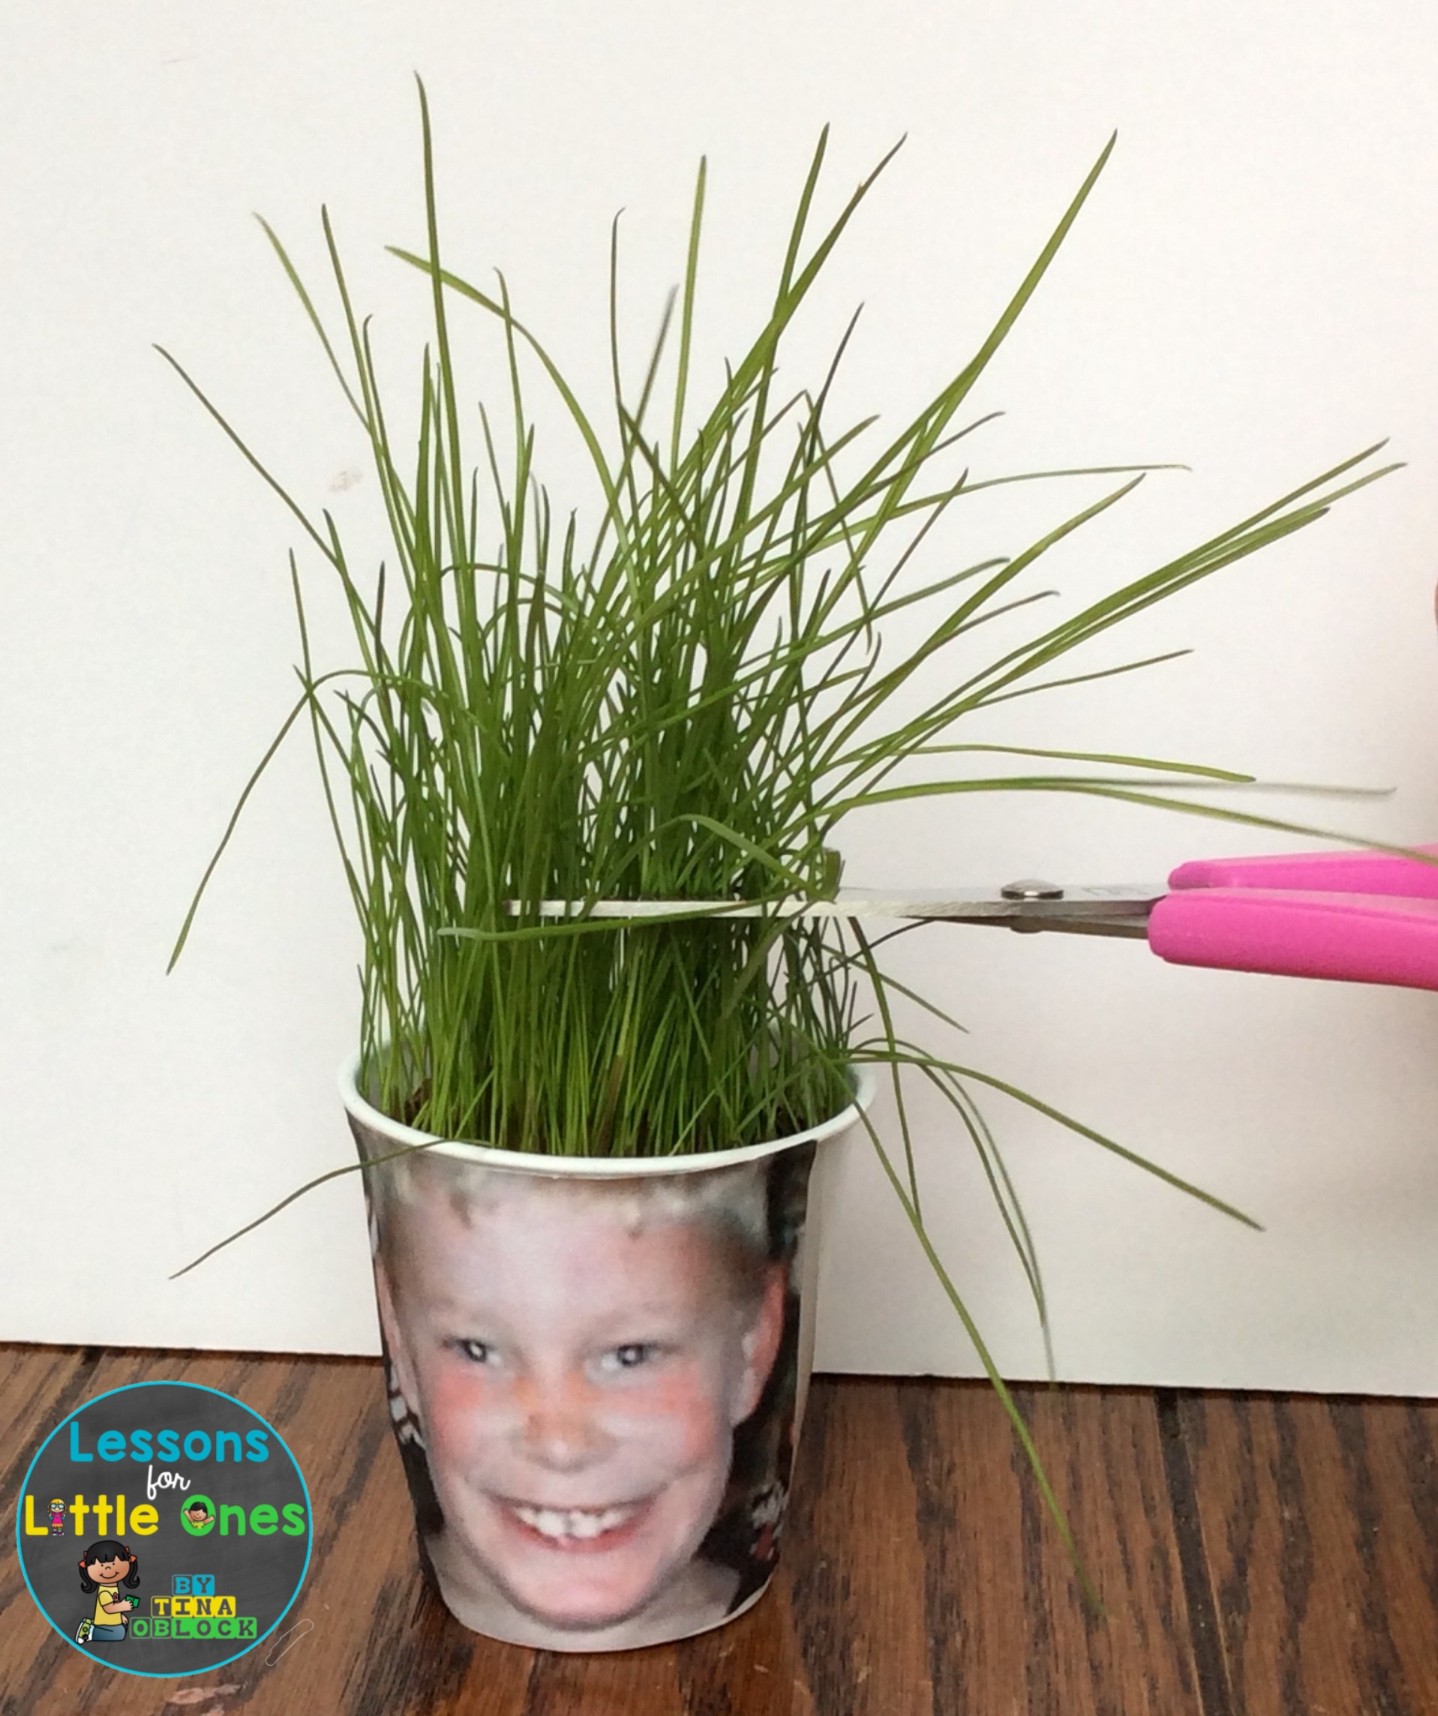
A fun option that I like to do is put faces on the cups or containers and have the grass be the face’s hair. You can glue on actual photos of the students’ faces or have them draw faces on the cup or use accessories such as wiggle eyes. You can also do this activity around St. Patrick’s Day and put leprechaun faces on the containers and grow green leprechaun “hair”.


I have students use plastic spoons to fill their cups about ¾ full with dirt/soil. Then have them sprinkle grass seed on top of the dirt. There is no need to measure out the seed, however I usually tell students to cover the dirt with seed (the more seed, the more grass that will grow). Then have them cover the seeds with a small amount of dirt.
Lastly, I have students water their seeds with a spray bottle. I like using a spray bottle because it prevents over watering (and then once the grass “hair” starts to grow, students pretend the water is hairspray lol).


I have students help determine the best location in the room for their grass seed (next to a sunny window) and guess how many days they think it will take for their grass to grow.
We usually see some type of growth by day 3 or so.

Once it sprouts the grass grows fairly quickly.


I’ve done several different activities with students. One is having them predict how long they think it will take their grass to grow and then recording the actual results.
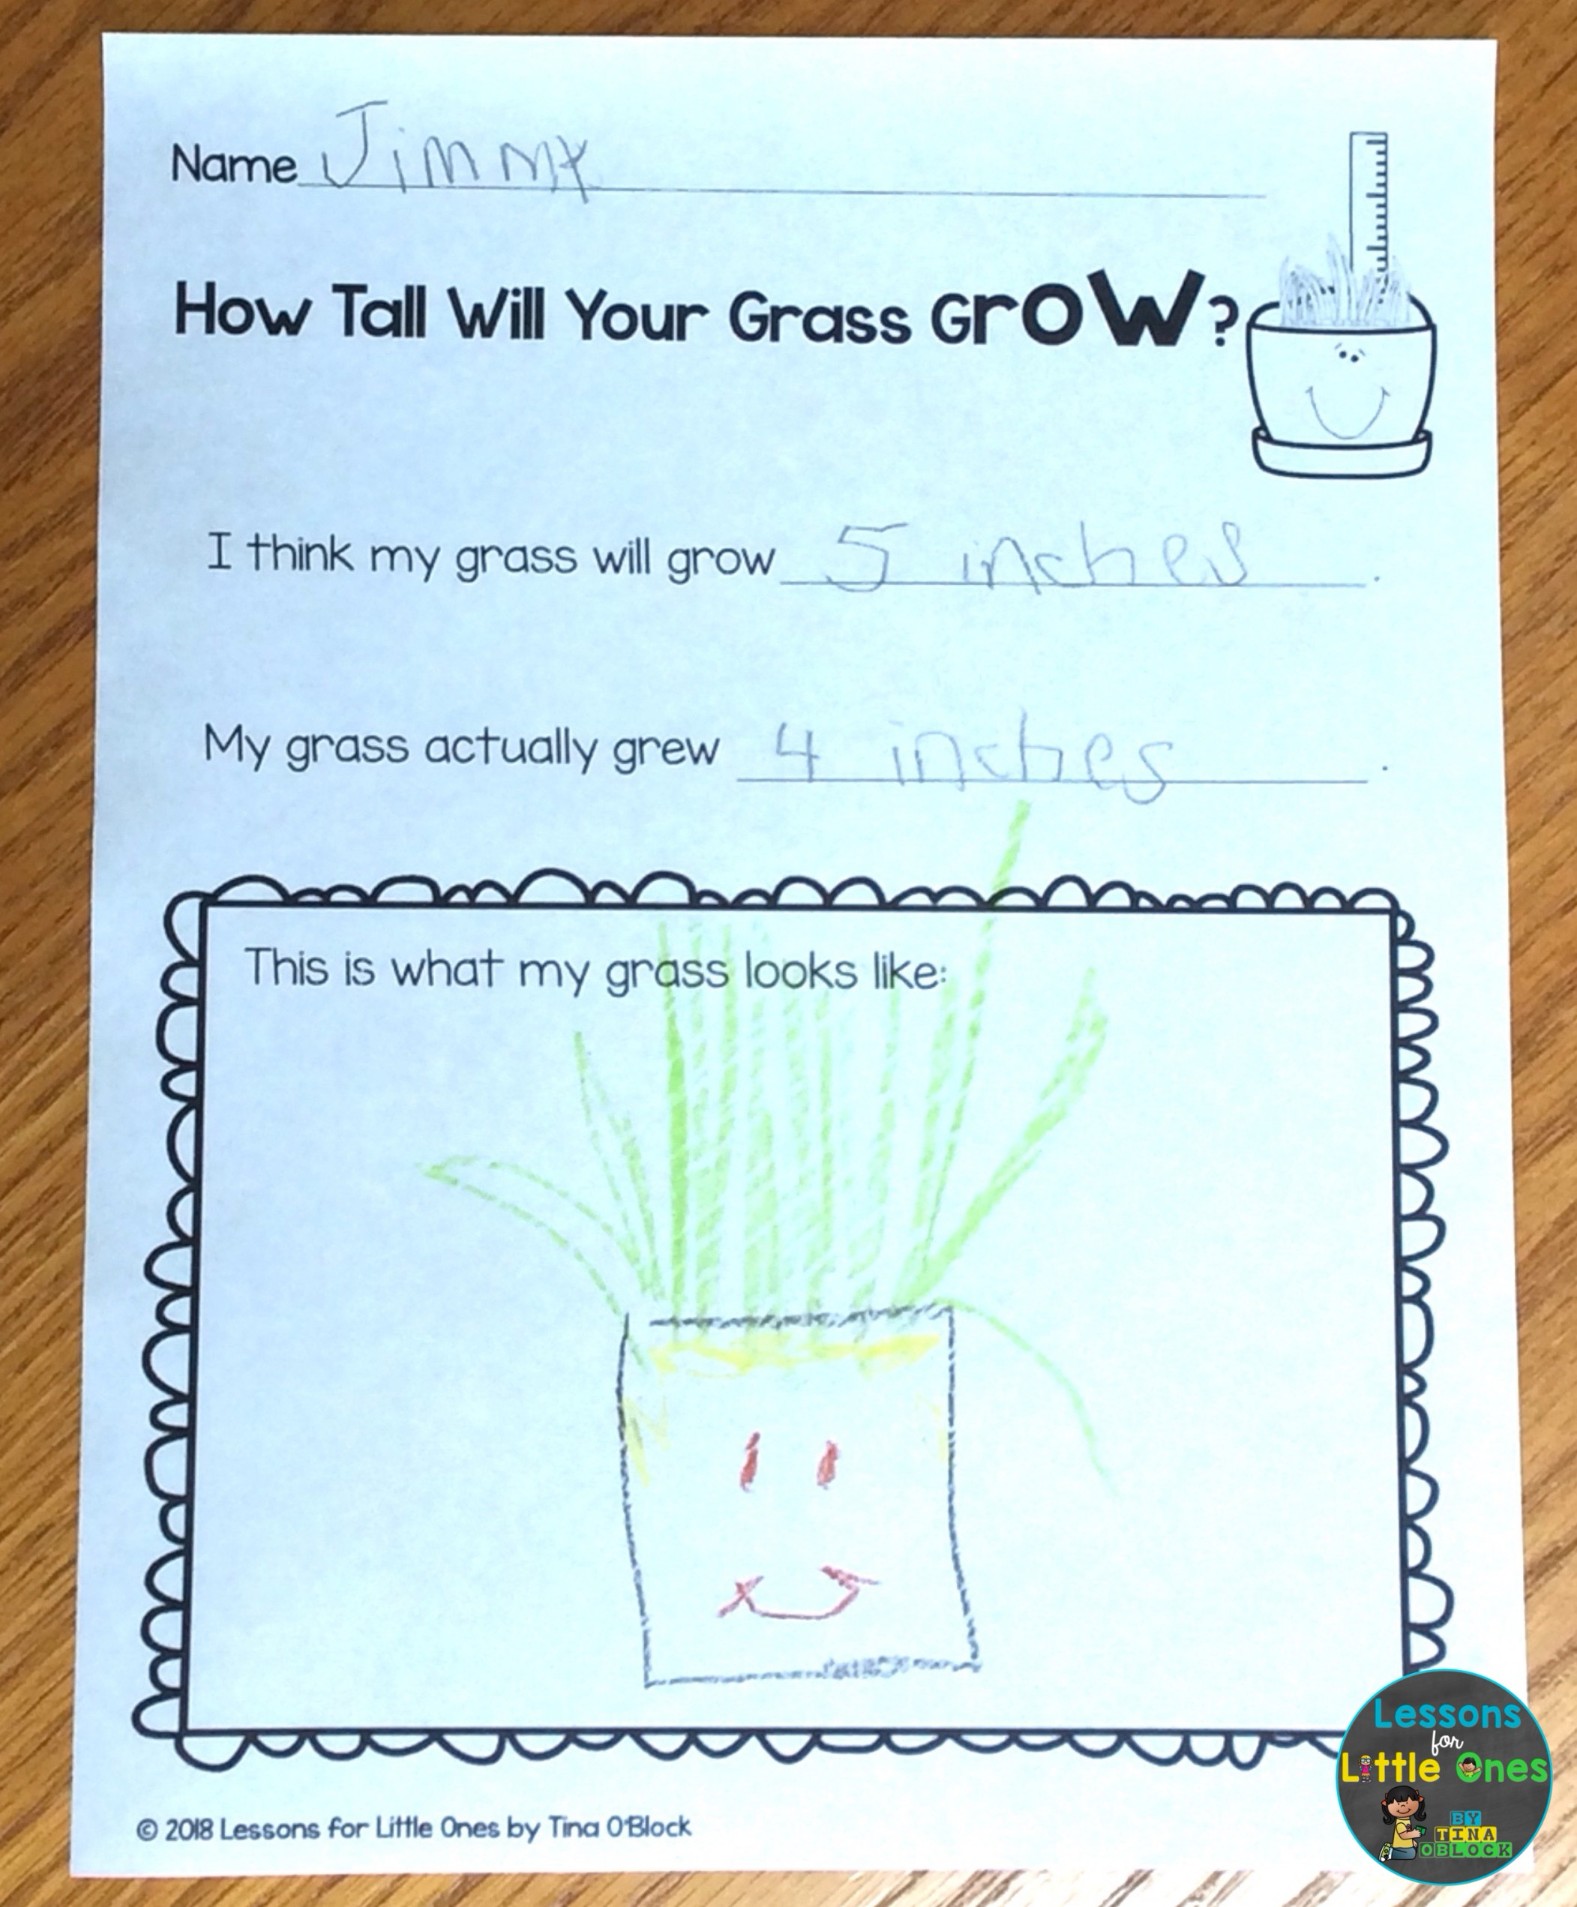

We practice measurement skills by measuring how tall the grass has grown.

After students’ grass hair grows, I let cut their hair with scissors and then estimate how long they think it will be until it grows back.


Growing Bean Sprouts
This is another experiment that has been around for years but is a wonderful way for students to observe beans sprouting and see what happens underground when a seed is planted.
I have done this experiment 3 different ways.
Growing Beans in a Jar
This is a good method to use if you want to do a class experiment and you do NOT want each student to grow their own seeds.
Stuff a large jar with paper towels. Students can help.
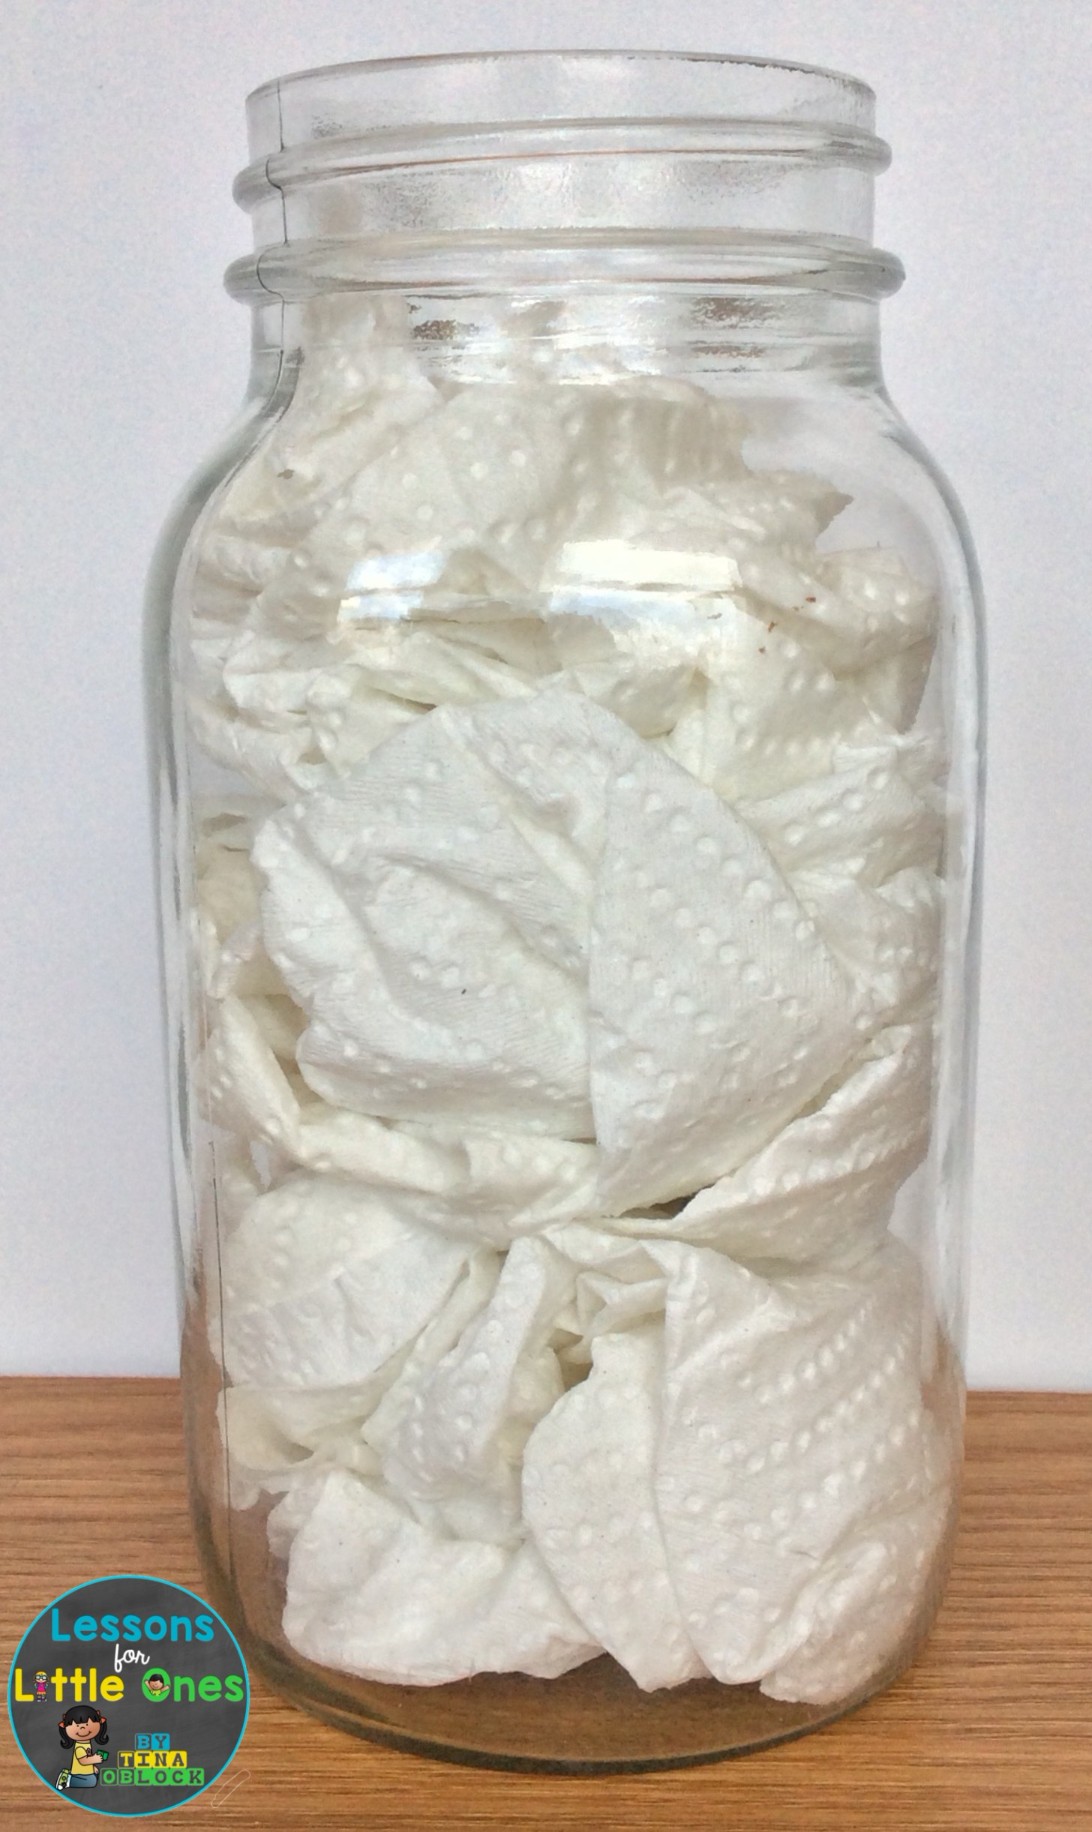
Slowly pour some water in the jar to wet the paper towels but do not flood it. If you have any excess water at the bottom pour it out. You want the paper towels to be damp not soaking wet.
Push your seeds down in between the jar and paper towels and make sure they are firmly in place (a snug fit between the jar and towels).
Place several seeds around each side of the jar. Place the jar near a sunny window.

Check on the jar daily. You should see a root come out of the seed first within 3 days. If you used bean seeds you should be able to observe the plant until it grows to the top of the jar.


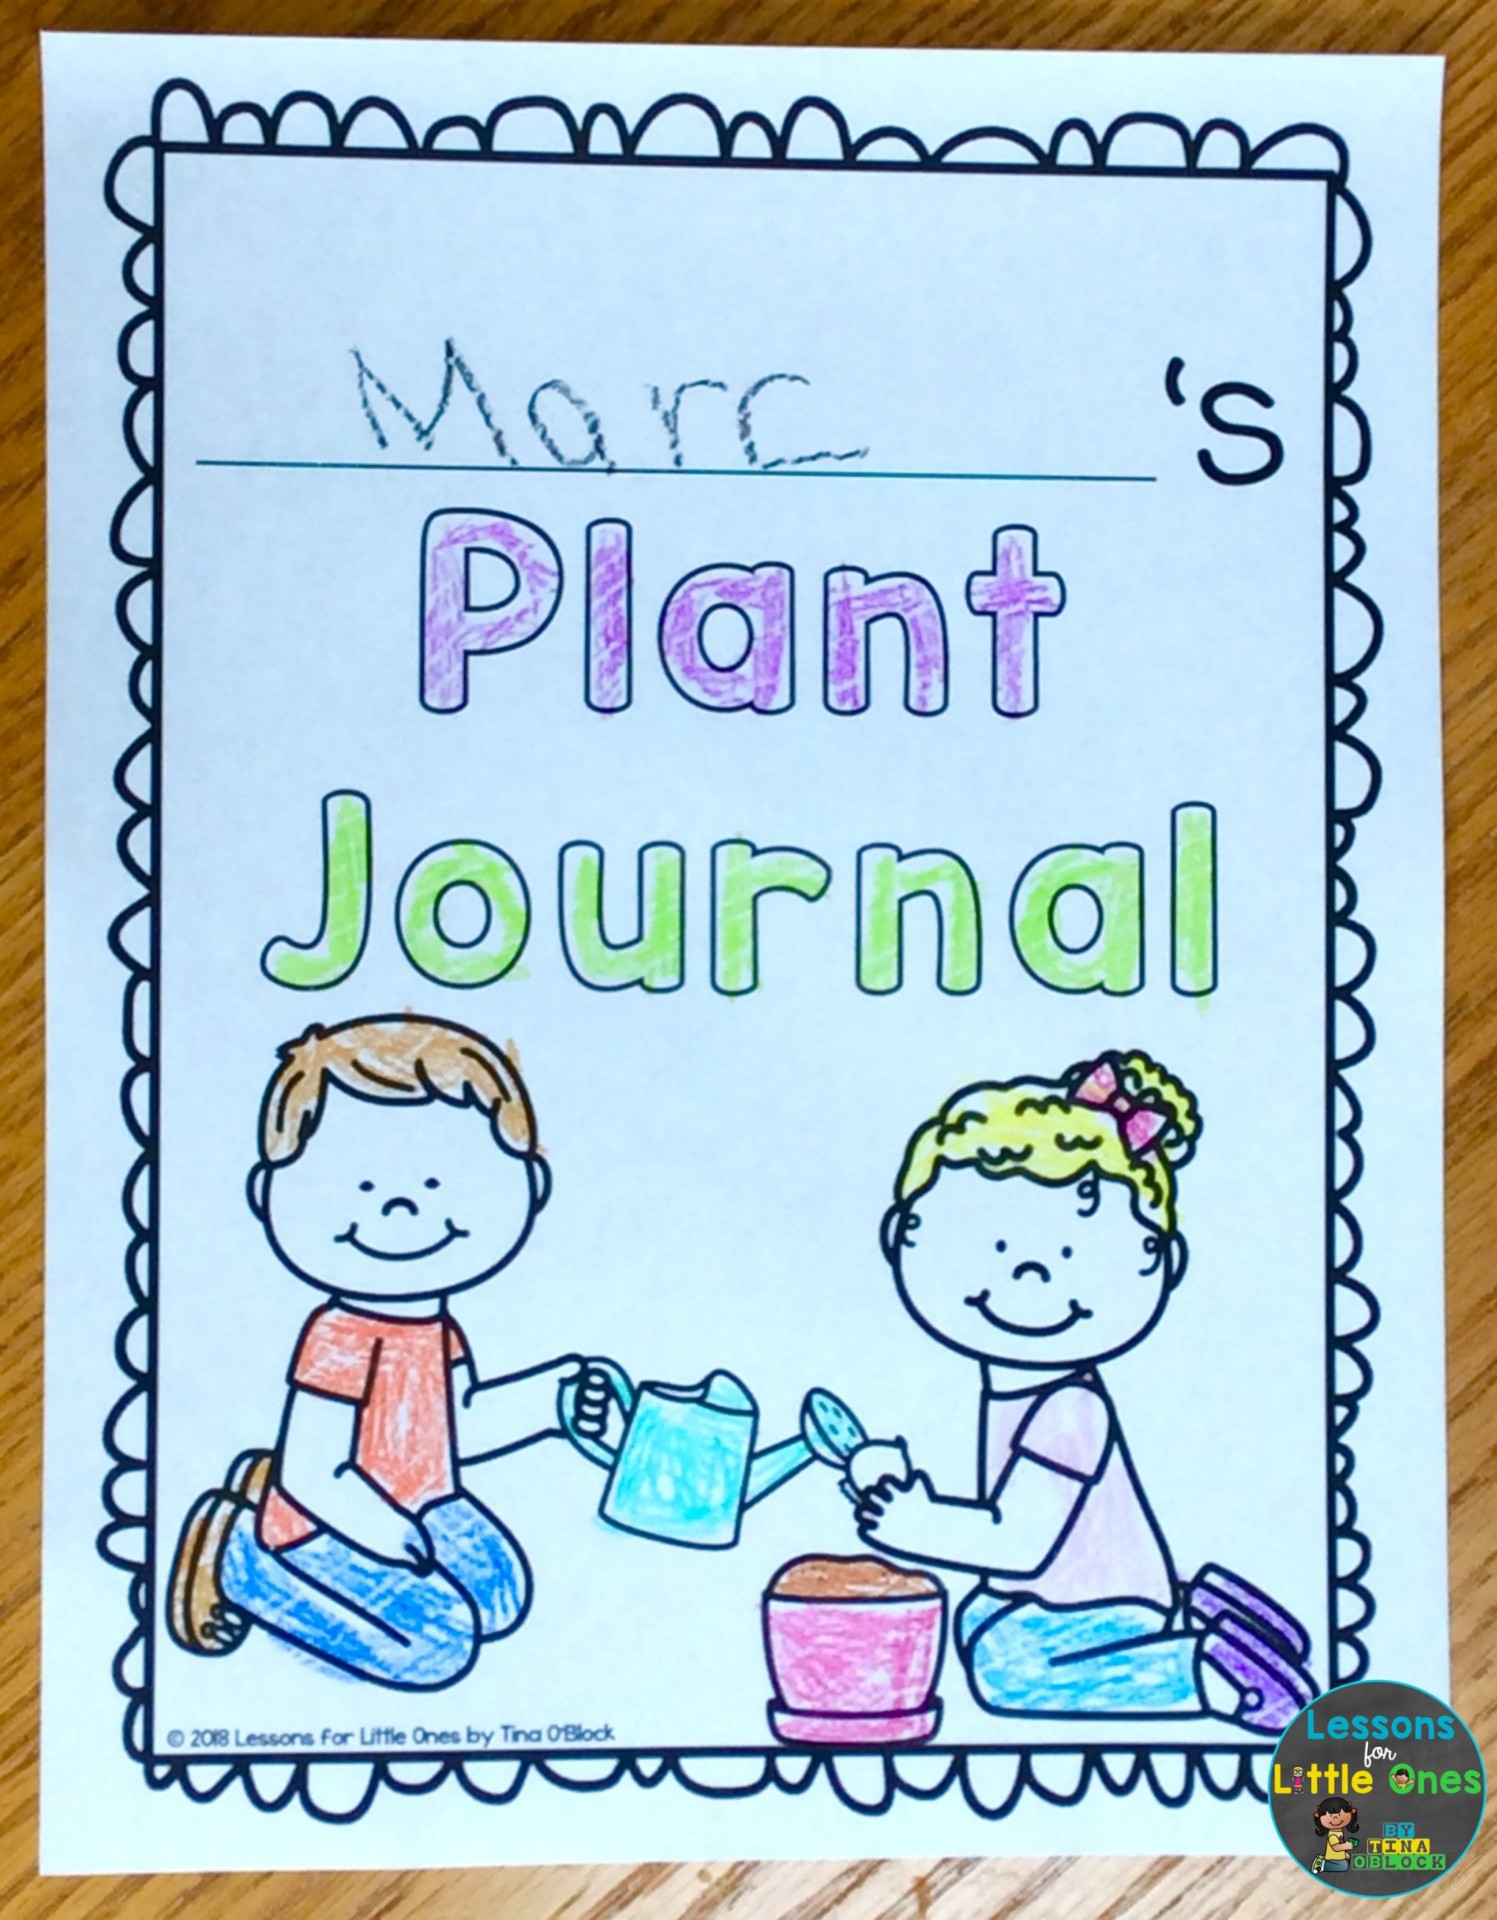
I like having students keep plant journals because they improve their observation and recording skills and give them a record of the seed’s growth. Students do a recording page for each observation.


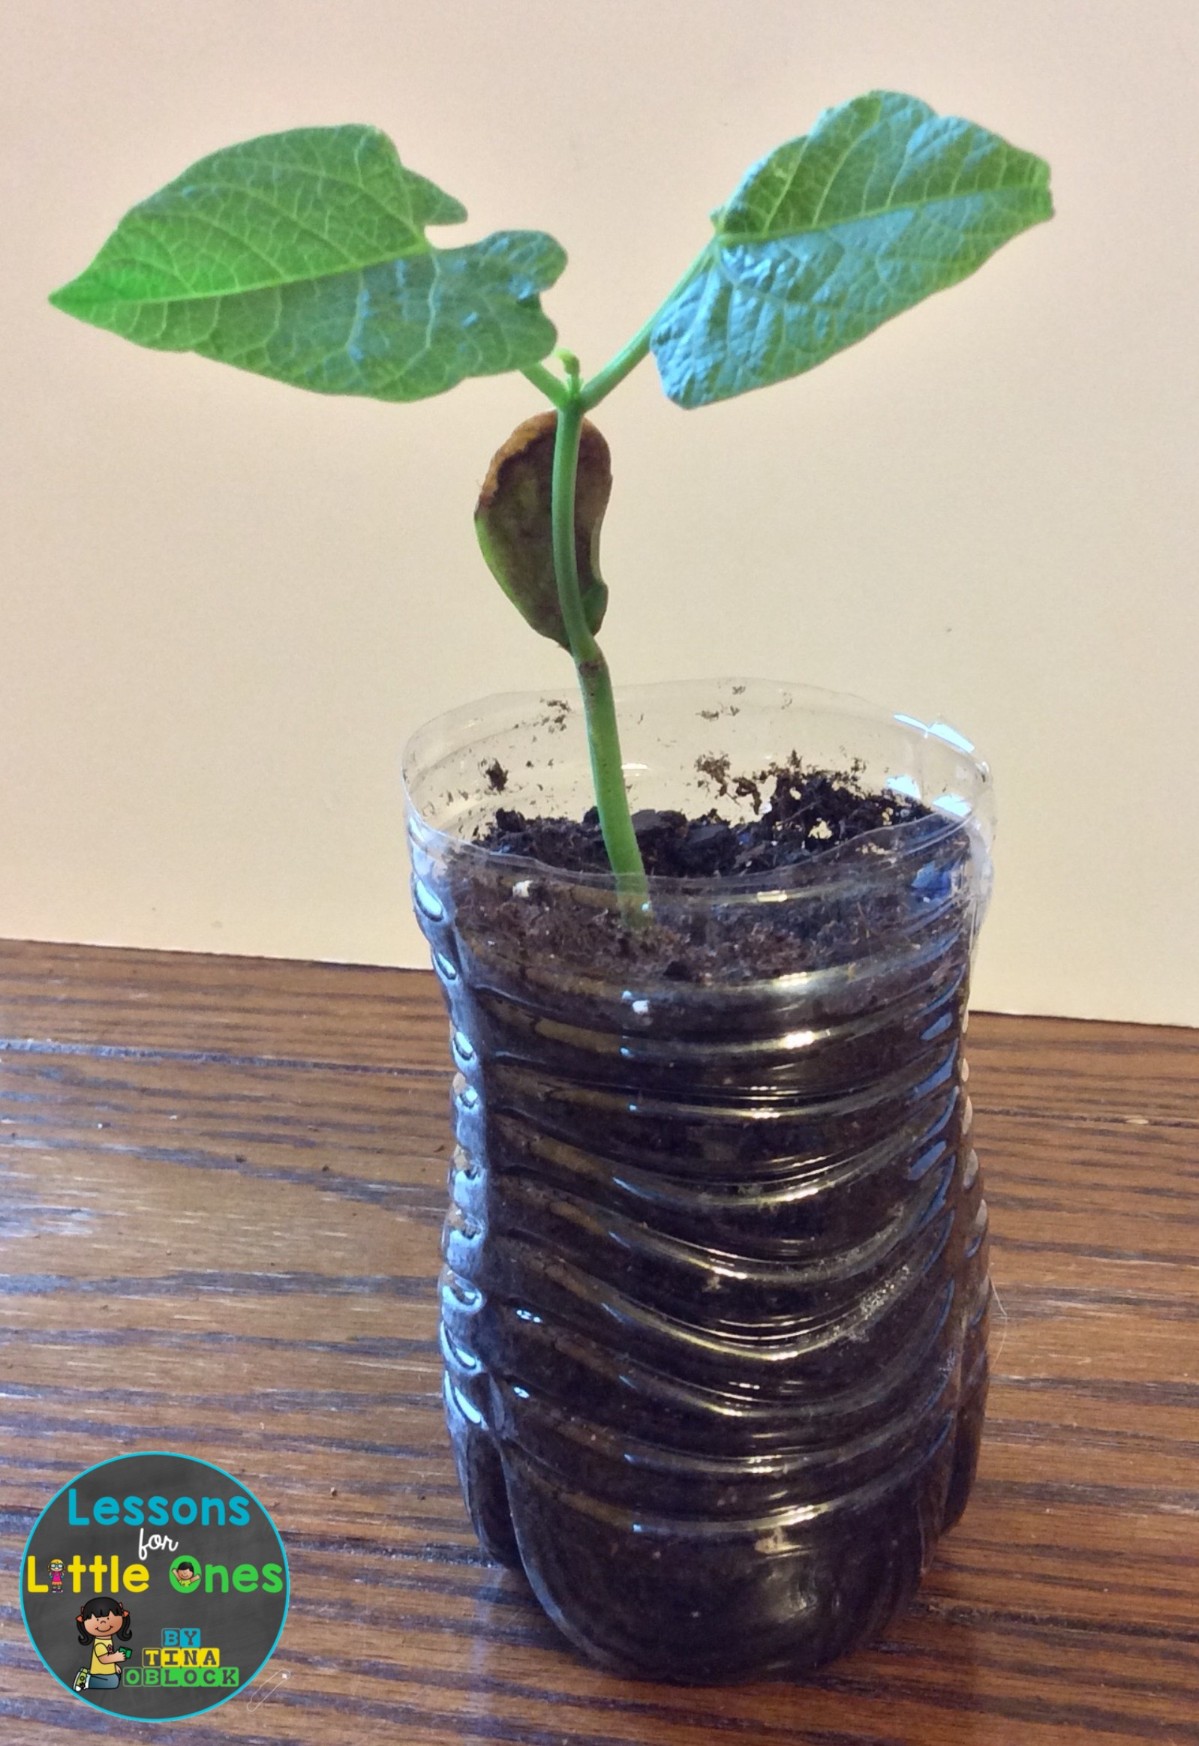
Sprouting Beans in Baggies on a Sunny Window
This method requires a bright sunny window on which you can hang baggies that contain the seeds. You are making a plastic baggie “greenhouse” for the seeds. You can choose to have each student plant their own beans in their own baggie or plant a few baggies as a class. If you choose to have students do their own seeds and baggies, it’s a good idea to plant extra seeds in case some students’ seeds do not grow. If this happens, switch out the seeds when students are not there to ensure that each child has at least one bean that sprouts.
If doing individual bags for each student, have students write their name on their baggie with a marker. Optional: you can also have them write the date. If doing a class experiment, you can write the date on the baggies.
For each baggie, place a dampened, folded paper towel along the bottom. It should have a fair amount of water but not be soaking or dripping wet.

Place one or several bean seeds between the paper towel and the baggie.

Tape or Sticky Tac them on a bright, sunny window.
Check them daily. You should see a root come out of the seed first within 3 days.


I have students keep plant journals similar to the one shown above but the recording pages are slightly different. I have the baggie already drawn for them to make it easier. Students can also upload real photos to Pic Collage and complete their journals using the app.


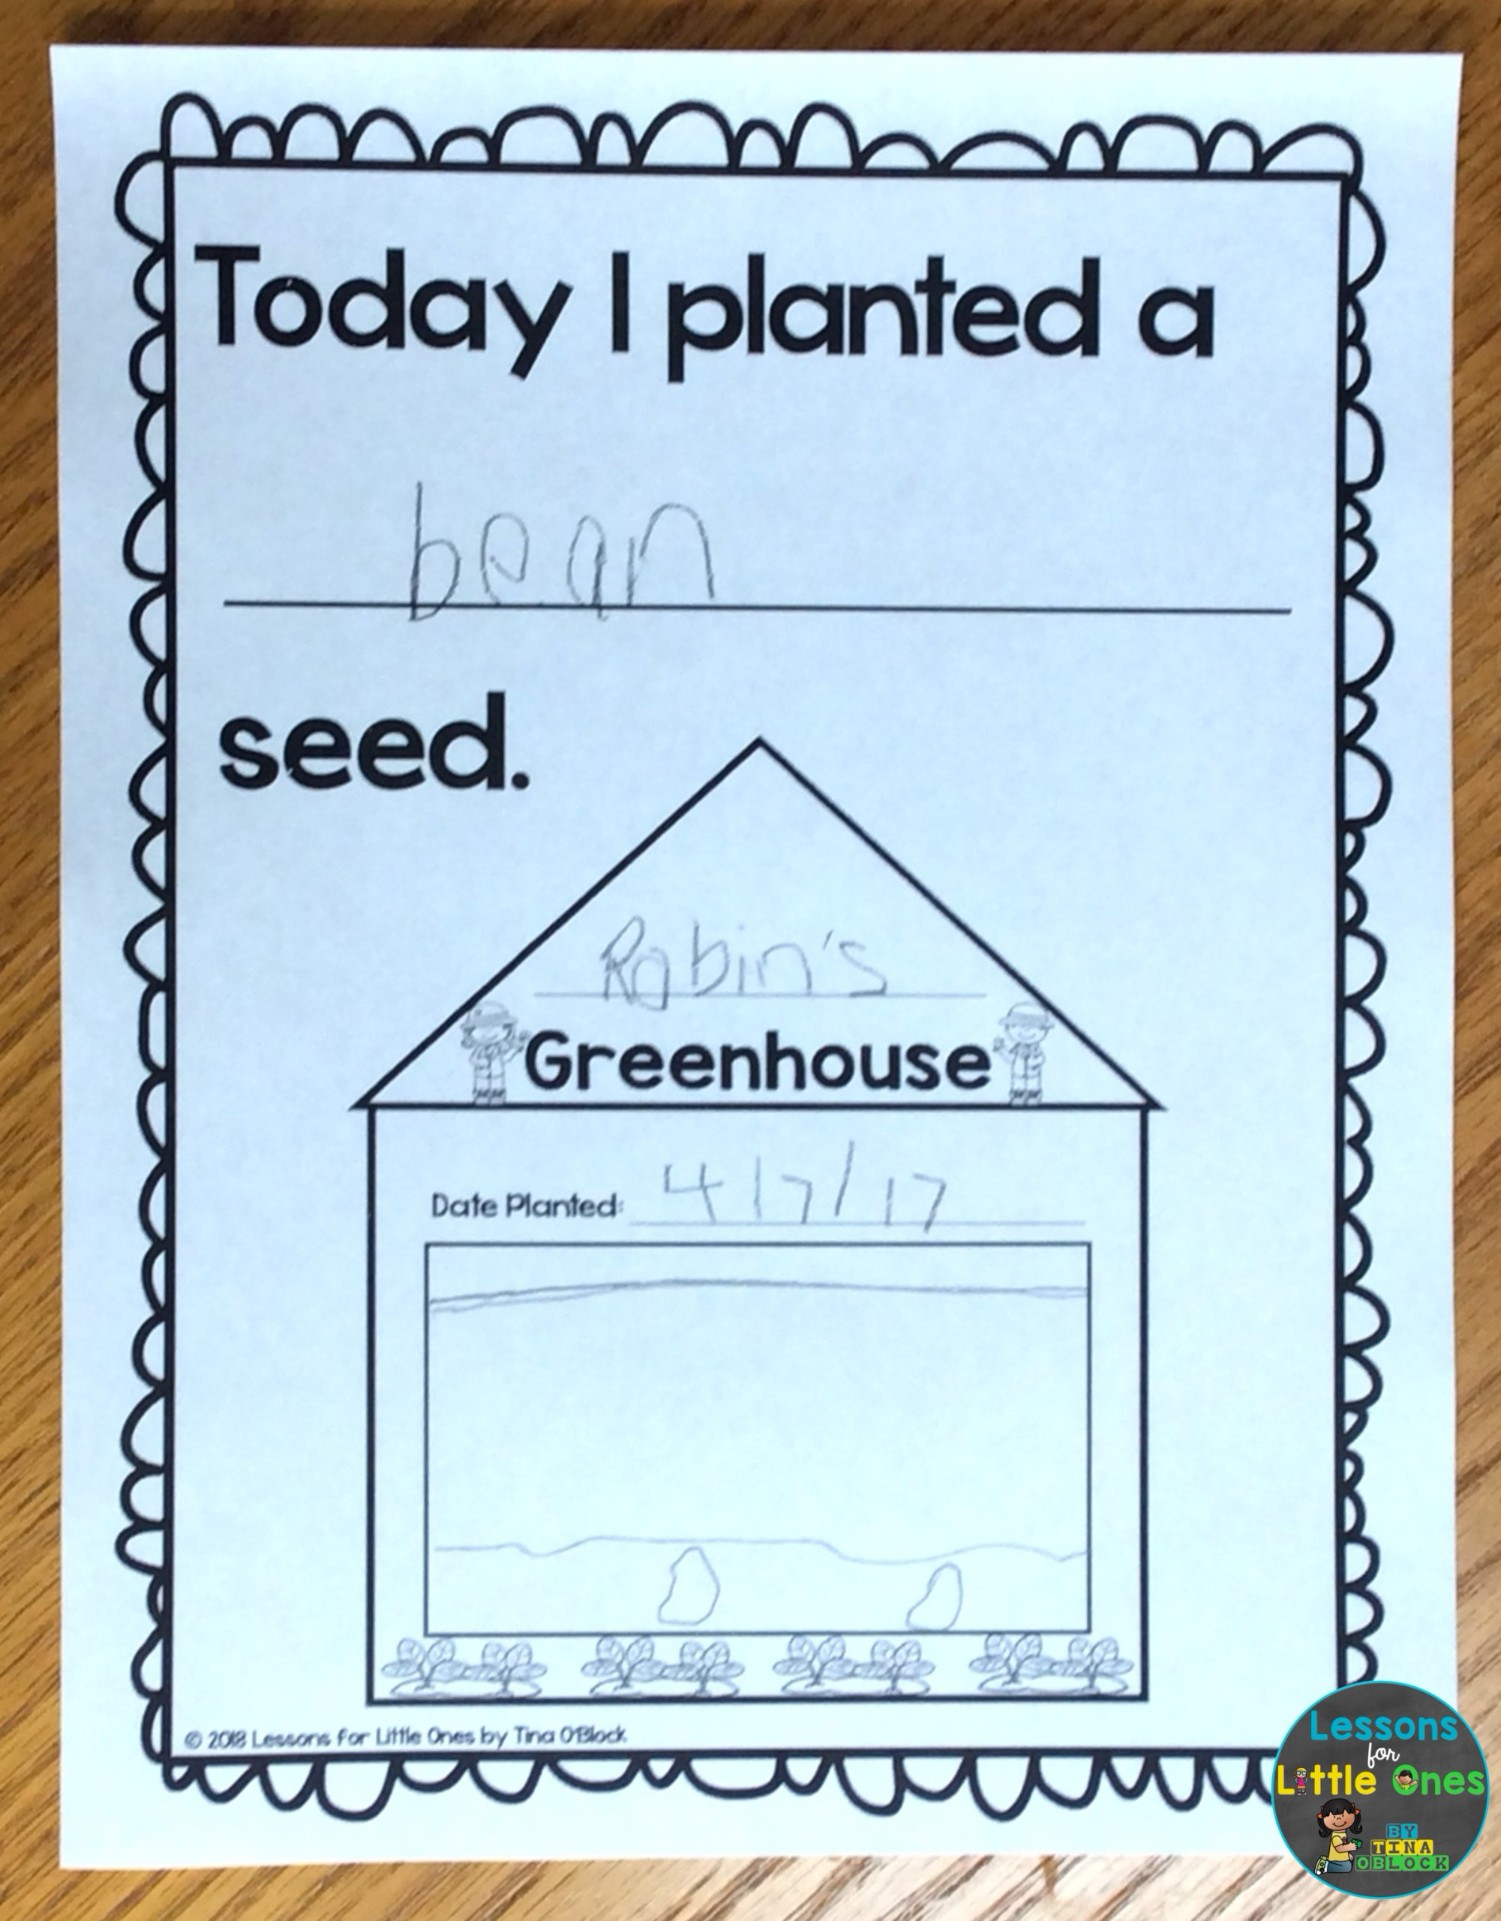
Growing Seeds in a Greenhouse on a Window
This method is the same as the baggie method shown above except students make a greenhouse from construction paper and place their baggie in the opening.

Hang them on a sunny window and make daily observations.

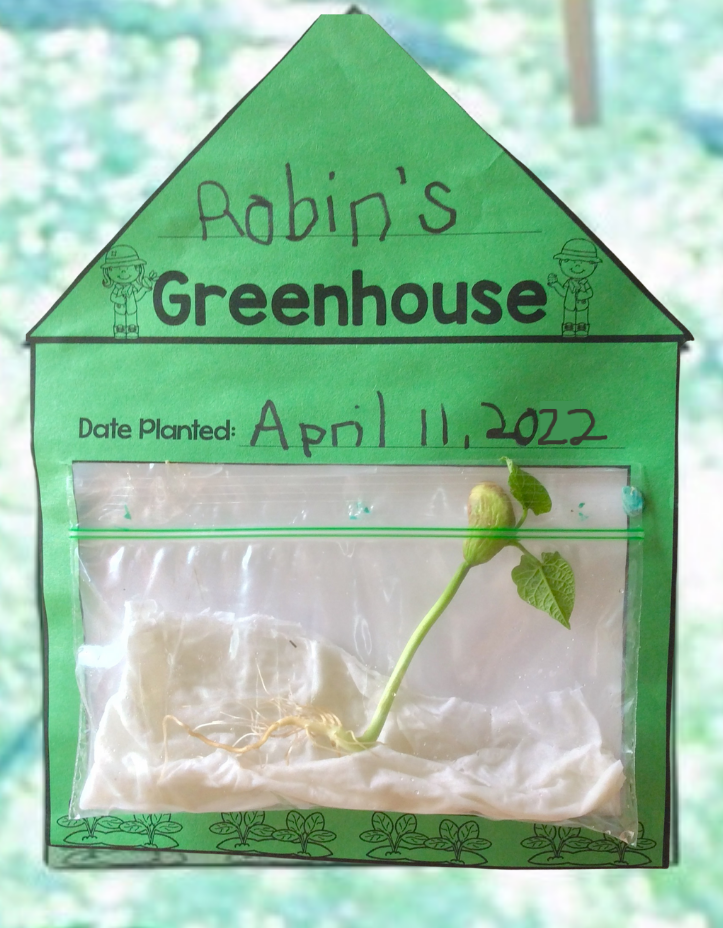
The journal pages I use for this method have the greenhouse already drawn to make it easier for students to record results.

We take the bean plants that have grown to the top of the jar or baggies and carefully put them in soil. I explain to students that the plant needs the support and nutrients from soil to continue to grow larger.
What Do Plants Need to Grow? Pages
I like using these pages to check individual student understanding of what plants need to grow. On the first page they have to circle the correct pictures. On the second page they unscramble the words and write the correct words on the lines.


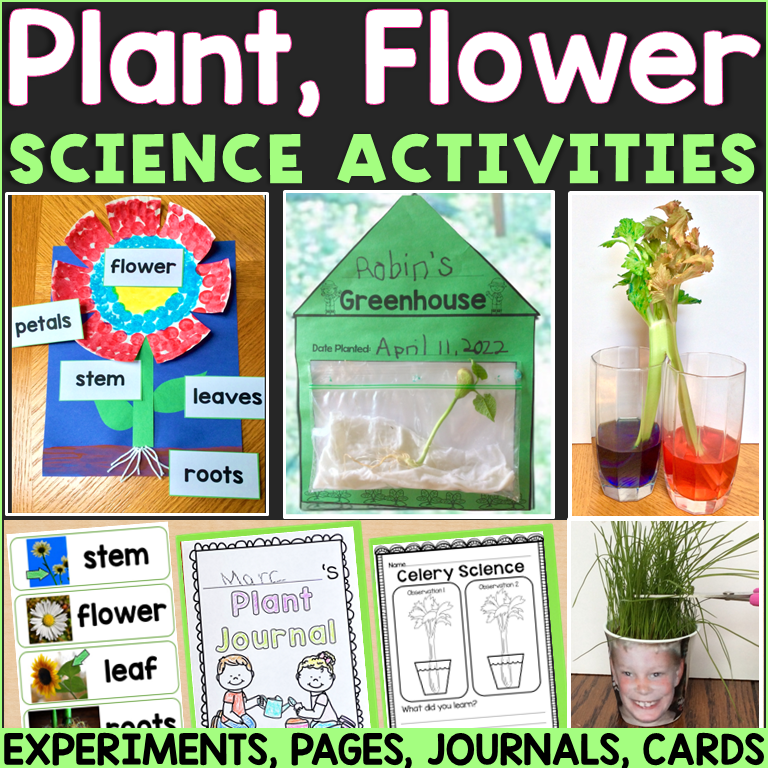
If you would like to use the printables, activities, word wall cards, label cards, play dough recipe, and more with your students they are available in my Plants & Flowers Science Activities resource. It also includes experiments for plants & seeds, step by step directions with photos for easy set-up, plant journal pages, and more. Click here to see complete details and photos of each activity.
Have engaging science experiments and STEM activities throughout the entire school year with this money-saving Science & STEM Bundle!