One of my biggest struggles as a teacher is finding ways to keep other students engaged and learning while I am working with small groups. My young students are not always able to work independently without direct instruction or feedback from me, but I have to do small groups/centers in order to give all of my students the individualized and differentiated instruction they need.
I have tried many solutions to this problem over the years, but the real game-changer for me was the introduction of technology. And I don’t mean iPads or tablets right away, I started with donated iphones from parents, then a few desktop computers and a smartboard, to now having iPads. All of these devices allowed me to easily create differentiated activities that engaged my students, gave them feedback and/or oral instructions, and provided the necessary practice they needed which increased both their independence and their confidence.
Now I know that when discussing technology use with young students, screen time is very important – with good reason. I am not saying that students should be put in front of a screen for long periods and made to passively absorb information with no interaction on their part. These center suggestions are meant to be used in conjunction with hands-on learning, used as part of the learning process – not all of it, and require students to be actively engaged in the learning process.
I am sharing some of my favorite independent center ideas that have worked throughout the years. No matter where you are with technology integration, you may find ideas that will work for you and your students.

QR Codes
Like I stated above, the first devices I had in my classroom were donated smartphones from parents so I started out using QR codes in centers. The students could scan the codes and watch instructional videos, listen to oral directions, view answers, listen to stories, etc. thus enabling them to work independently and enabling me to be with small groups.
Young students love scanning the codes and seeing what happens, they think they are magic LOL which keeps them engaged!
QR codes are pretty simple to create using any free QR code creator, can be linked to just about anything (text, audio, video, etc.), and only require a device that has a free QR scanner such as a smartphone or iPad. I also like that they can be combined with hands-on learning.
Instructional Videos
There are a wide number of instructional videos already available online or you can create your own using your smartphone. Simply record yourself completing the center and explaining each step. Students can scan the QR codes and watch the videos as many times as needed.
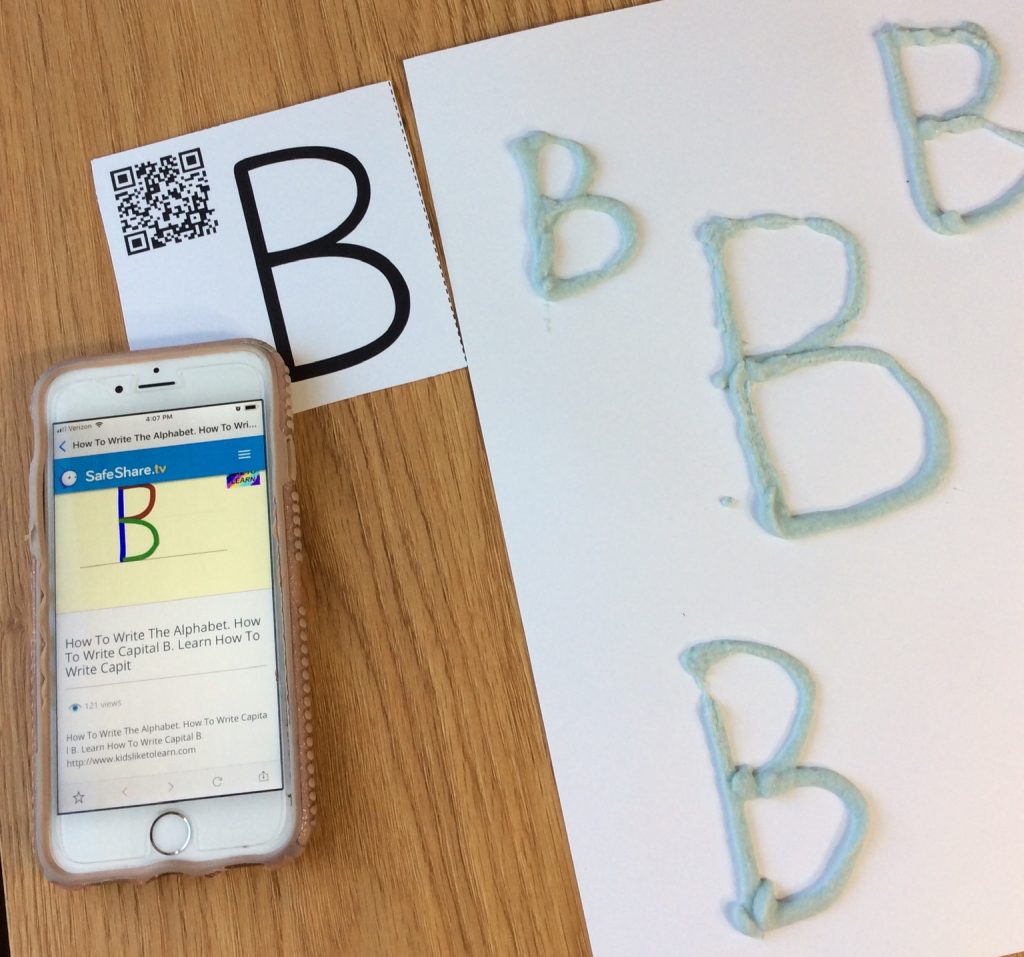
Here is one example of how I use QR Code instructional videos. One of the first things we do at the beginning of the year is learn / review alphabet letters and practice writing them. A fun way I get my young students interested in writing is to let them practice “writing” letters in a variety of ways using many different mediums (salt, sand, salt dough, gel bags, etc.).
I used to have to do this in small groups and show students over and over again how to form / write the letters. Then I found instructional videos online, made QR codes for each letter (uppercase & lowercase), and set them in the center. Students scan the QR code on the letter card, watch how to write the letter, and then practice on their own. I did not have to be right at their side demonstrating it over and over – it was like they each had their own teacher! Plus, I could easily differentiate the center by simply assigning certain letter cards to students.


Oral Directions (QR Codes & Seesaw App)
Since my young students can not yet read written directions, I record oral directions for their center activities. I have used both QR Codes and, more recently, the Seesaw App for this.
If using QR Codes, I link to the voice recording and place the QR Code directly on the paper. Students scan the code, listen to my audio directions, and complete the activity. In this example, I tell them which pumpkins to circle or “pick” from the pumpkin patch.

More recently, we started using the free app, Seesaw (I highly recommend trying it if you haven’t already!). It allows me to record audio directions when assigning activities. Student can listen to the audio directions and know exactly how to complete the activity on their own (bonus, it’s paperless!).
Here is the same activity using Seesaw. Students listen to the audio directions and then complete the activity.


View Answers / Self-Checking
My young students love getting immediate feedback! They are constantly wanting to know, “Is this right?”. And let’s face it, in this “instant gratification” world the problem is getting worse. One of the ways I deal with this is by using QR Codes to create self-checking centers. They make the activity a little more engaging for students and create a little “suspense” before they see the correct answer.
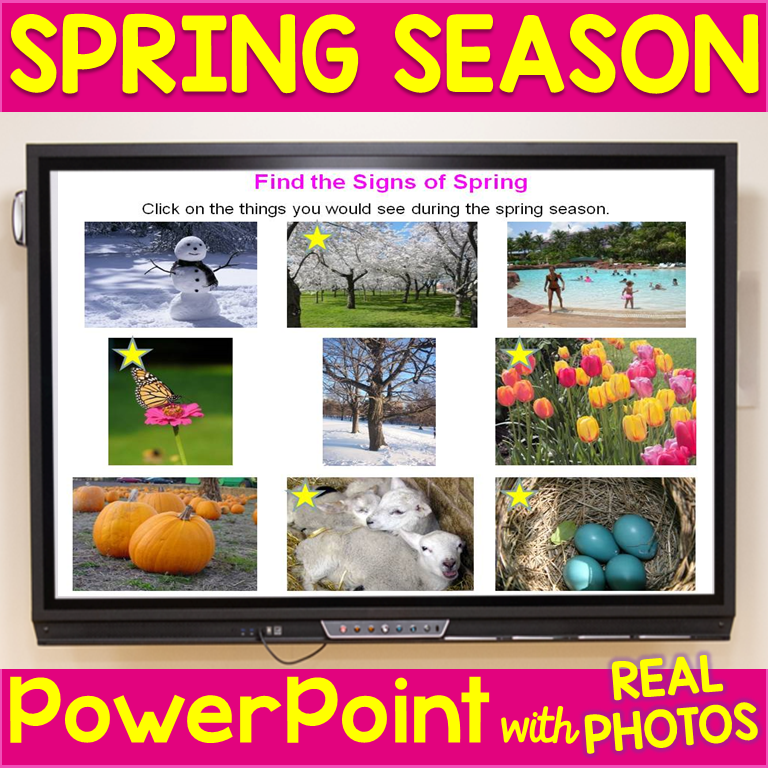
I did encounter a problem when I first started using QR Codes for answers – the text in the free QR Code Generators was too small for my young students. Therefore, I started making larger text or number pictures using PowerPoint, saving them as JPEGs, and then uploading them to the QR Code. It made a world of difference! Here are a few examples of the large print numbers:
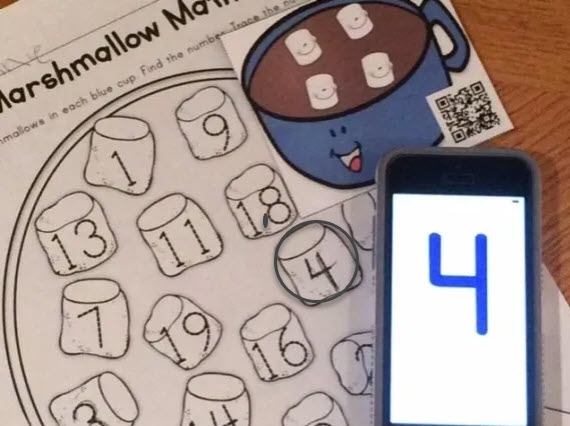

If you would like a FREE QR Code Activity that uses the larger number answers, CLICK HERE.
Listening Center / Reading Center using QR Codes and Epic App
Another great independent center for your students is a reading center where they listen to books. Listening to stories gives students a model of good reading/fluency, improves their listening skills, increases their vocabulary, and introduces them to books above their reading level.
I have set up an independent reading center using both QR Codes and more recently, the Epic app on iPads. There are many read alouds online of popular books that can be easily linked to QR Codes. I simply place the QR code beside a picture of the book cover. Students can choose a book, scan the QR Code, and follow along.
If you are not familiar with the Epic app, click here for more information. It is an app that has access to thousands of books for kids as well as videos and is free for educators. You can assign books for your students or allow them to choose their own. Students choose the Read to Me option to have the books read to them.

I also use QR Codes in our reading and writing centers to help students learn new vocabulary or theme words. I create them in PowerPoint and make strips with a picture, the word, and then the QR Code. I then create a center by simply cutting the pictures off the end. Students match the pictures with the words and then scan the code to see if they are correct. When scanned, the students see a full color photograph of the word and they hear me say the word.

Boom Cards
I must admit that Boom Cards are a personal favorite and students beg for Boom! Boom Cards are digital task cards that are hosted on the Boom Learning Site. They are interactive, engaging, and just plain fun for students!
Why do I love Boom Cards?
- Students can complete them independently.
- They are self-checking. Students receive immediate feedback.
- They require no prep (no printing, cutting, laminating). They are ready to use on download.
- They have an audio feature – oral directions, individualized instruction.
- They are interactive and engaging for students.
- Data collection (individual reports for rate & accuracy, see student progress, hold students accountable)
- They can be used on a variety of devices (laptop, desktop, iPad, smartphone, tablet, or interactive whiteboard).
Easy Student Log-In
If you are not familiar with Boom Cards, they are very simple to use and set up. They also have a very easy student log-in that is perfect for my young students! You can choose to have picture passwords instead of words which makes logging in so much easier for kinders! Students simply click their name (they can pick avatars too!) and then click the picture password. Simple!
For more detailed information on setting up your account and class, visit this blog post or the Boom Learning Help Desk.


Easy Differentiation
It’s also easy to differentiate and work on a variety of different skills using Boom Cards. Simply assign the appropriate deck to each of your students. Finding decks is not a problem because there are a lot of different Boom Card resources on both Teachers Pay Teachers and Boom Learning or you can easily create your own.
For example, I can have some students work on letter recognition, others on letter sounds, and still others on building CVC words. Students love the interactive nature of the cards so keeping them engaged and on task is not a problem. Plus, they can work at their own pace which helps them build confidence.


Self-Checking with Data Collection
We all know that young students love instant feedback and gratification and in this digital world they are used to getting it! Boom Cards’ self-checking feature lets students know right away whether they are correct which is a real motivator for them and it allows them to work independently (no more “Is this right?” interruptions).
What I love even more is the data collection that is available in the paid version of Boom. It is hands-down my favorite feature! It saves me sooooo much time and holds my students accountable for their work (I can see exactly what they completed)!! It automatically collects the rate and accuracy data for each student so I can easily see what each of my students has mastered and what skills with which they are struggling and how much work they are completing. I can easily print the individual student reports for parent-teacher conferences or when I need to show that certain students may need remedial or gifted instruction.
Audio & Video Features – It’s Like Having a Virtual Teaching Assistant Helping Students!
Do you ever wish there were 10 or 20 of you so that you could give each student the individualized instruction they need? The audio & video features allow you to reach each child with specialized instructions or explanations. They are game-changers in the early childhood classroom where students can not yet read instructions or are not quite sure what is required of them at a center. You can record step by step instructions, show video demonstrations, explain concepts, make clear what the picture is (is it a rug or a mat?), guide students through a process, etc.
Engaging Seasonal or Themed Centers that Hold Student Interest
My young students get so excited about anything holiday or seasonal so having fun, seasonal centers really keeps their interest! I love that I can find or create engaging seasonal centers that I can use for centers or for party stations.


If you would like to try Boom Cards with your students for free, click one of the free Boom Cards decks below:
Pumpkin Life Cycle Boom Cards Free (Life Cycle Stages of a Pumpkin)
Yellow Color Recognition Color Word Boom Cards (Learning Colors – Yellow)
Free Kindergarten Sight Words Practice Digital Boom Cards Sample
Google Classroom
Google Classroom is another great option for encouraging self-directed learning and getting students excited about the learning process. Teachers are creating and sharing a large number of Google resources on Teachers Pay Teachers for all grade levels and subject areas so finding quality materials is getting easier and easier.
It wasn’t long ago that Google Classroom was typically only used in the upper elementary grades, but in recent years with the advancement of technology, it now used in a large number of kindergarten and first grade classrooms with success.
It is free to set up, all you need is a Google account and Google has very easy tutorials on setting up your classroom. Learning to log-in may take some practice with younger students, but with visual aides of their log-in information they catch on pretty quickly.
Google Classroom has a lot of the same benefits as Boom Cards, and I have used both Google Slides and Google Forms successfully with my young students as independent activities.
As of now, if you wish to add sound to Google Classroom you have to link to a YouTube file (hopefully that will be changing soon!). Therefore, your school must allow access to YouTube in order to for you to be able to use the audio feature. If you do not have access to YouTube, Boom Cards are a much better option.
Centers set up in Google Slides are able to have movable pieces and be interactive in nature which keeps students engaged and interested in learning. What I often like to do is make the Google Classroom center an extension of my small group activity to give students extra practice and better enable me to check individual understanding of a concept. The bonus is, I don’t have to have a large amount of actual manipulatives on hand – I can make them virtual. I work in a very small private school and we do not have access to a lot of materials; therefore, being able to use virtual manipulatives for practice is a game changer (plus, I don’t have to worry about lost or missing parts!).
For example, in my small math group we were using dominoes to help us learn number bonds.
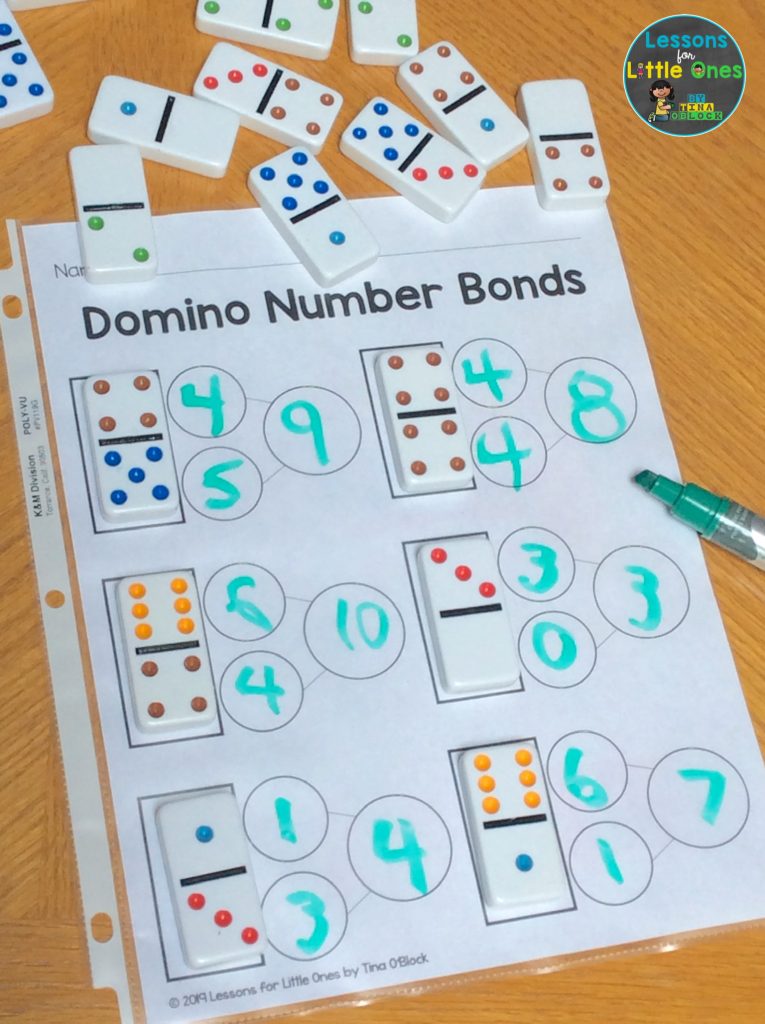
In order to give my students additional independent practice without having to use many sets of dominoes, I used Google Slides and differentiated the skill levels:


If you would like to try this Google Classroom Number Bonds resource with your students for FREE, CLICK HERE.
With Google Classroom, once students submit their work you can access it and scroll through to check what they completed and how they are progressing. This holds students accountable and gives you paperless records of their center work that you can access from school or home.
So why not foster your students’ love for digital resources AND teach them to be more independent while making learning more fun? Embrace the technological advances as they enter the classroom and make them work in your favor so you can have more time with your small groups! I hope you found some helpful ideas for your classroom. As always, if you have any questions or need anything additional please let me know!