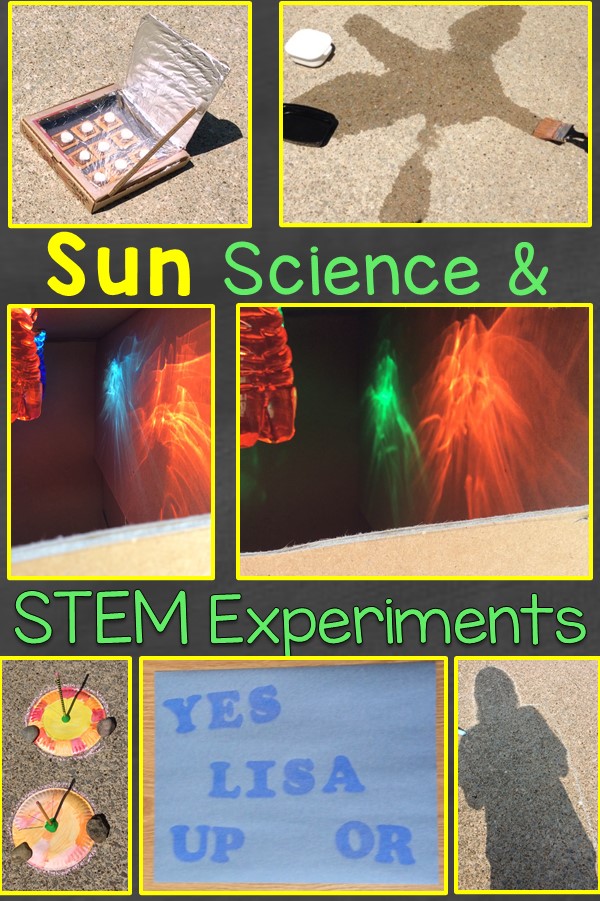
The end of the school year signals the beginning of summer for many students. This is the perfect time of year to teach about the sun and have some “fun in the sun” performing learning activities outdoors! These hands-on activities are perfect for keeping young students engaged and learning those last few days/weeks of school. They can also be used with children at home during the summer months or during summer camp programs.
Begin with a brief explanation of the sun. Explain that the sun is actually a very big star in the center of our solar system. It is the closest star to the earth and is 109 times larger than the earth. Two suggested books to read are:


Here are 10 simple and fun science experiments that help children learn about the sun through hands-on explorations.
Sun versus Shade Experiment
This is a simple experiment that demonstrates the sun’s heat as well as the difference between sun and shade. It helps young children understand that the sun radiates heat and can makes things hot.
Place a variety of metal objects and a piece of a chocolate bar on each metal baking sheet.
Tell students that you are going to place one of the baking sheets in the shade and one in the sun. Ask them to make predictions about what may happen to the objects.
Go outside and place one of the baking sheets in a shady area and the other one in a sunny area. Leave them for an hour or two depending on the outdoor temperature. You want the objects in the sun to be warm to the touch but not scalding hot.


Observe and allow students to feel them after several hours (check the objects first before students touch them as they may be too hot to touch at first). Discuss what happened and why. Lead them to understand that the objects in the sun were warmer because the sun radiates heat which makes things warm.

I like to have students record their observations on recording pages. Since getting iPads, we were able to insert actual photos of the items using Pic Collage (Pic EDU). I like how using the iPads to record observations helps students to learn how to use technology as a tool.


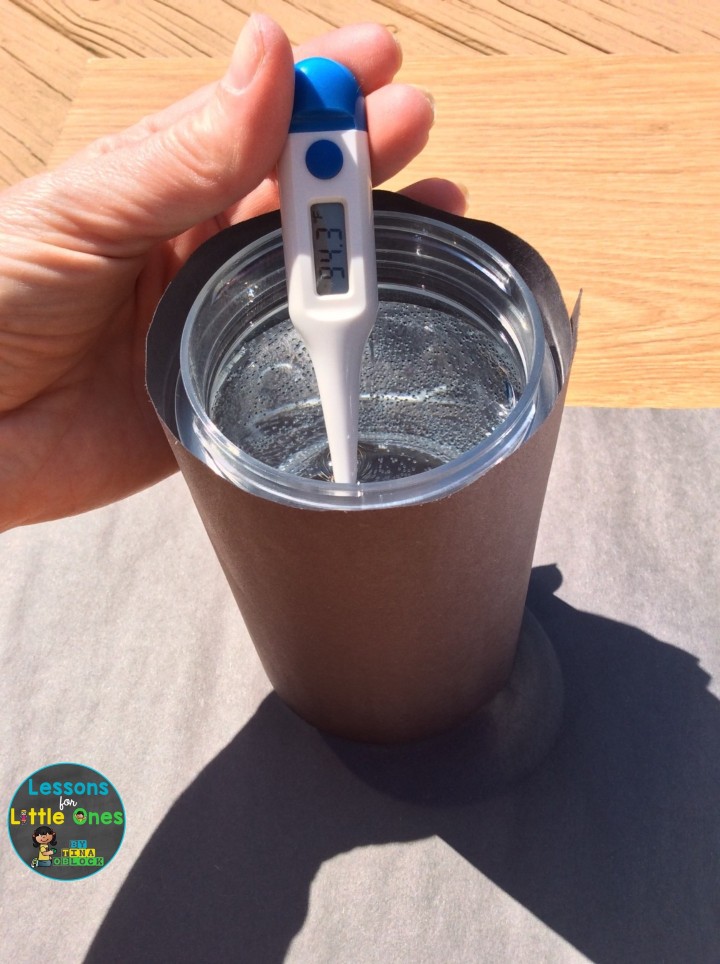
What Absorbs More Heat – Black or White?
Since students learned in the previous experiment that the sun gives us heat and makes things warm/hot, I like to challenge them with the question of whether they think black paper will absorb more heat/become hotter than white paper and why. I then have them record their predictions.

To discover the answer to the question, fill 2 jars or containers with equal amounts of water that is the same temperature. Wrap one jar with black paper and one jar with white paper. Place the black one on a piece of black construction paper and the white one on a piece of white construction paper and put them in the sun for several hours.

You can also do an additional experiment with a black crayon and a white crayon.

After several hours, use a thermometer to measure the temperature of the water in each container. The water in the black container should measure warmer than the white. If the water in the black container is not too hot, students can also feel each one.

Observe the crayons after several hours. You should observe that the black crayon melted more than the white.

Light energy from the sun can be converted to heat energy. The black paper absorbs more heat (light energy) from the sun because it does not reflect light like the white paper.
After discussing the results students can draw and/or write their observations or if they are using technology, they can insert actual photos of the results (we like to use Pic Collage).


Solar Oven Science Experiment
A favorite of students and myself!!
This experiment demonstrates solar energy and shows students how to trap the sun’s natural heat to make an oven.
You can choose to make one solar oven or several depending on how many snacks you wish to bake and how many students you have in the class.
This resource explains how to make s’mores in the solar oven. However, you can also melt cheese onto nacho chips if preferred.
Remove any paper liners that may be inside the pizza box.
Using the ruler and marker, measure in 1 inch from each edge of the pizza box lid except the side with the hinge.

Using the utility knife, cut all the way through the lid on those three sides of the square. Then fold the flap back slightly along the hinge side.
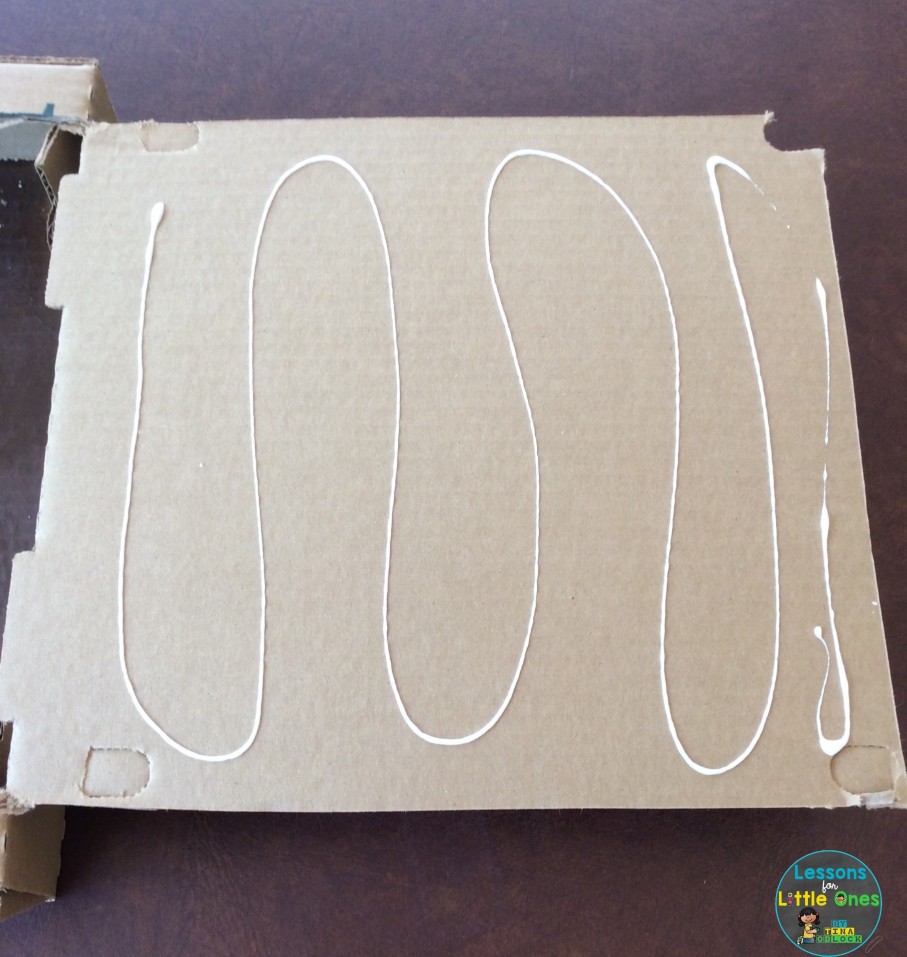
Put some glue on the inside of the flap. Glue a piece of aluminum foil on the inside of the flap keeping it as smooth as possible. Fold the extra foil over the edges to help hold the foil in place. Smooth it out. This will reflect sunlight into the oven.

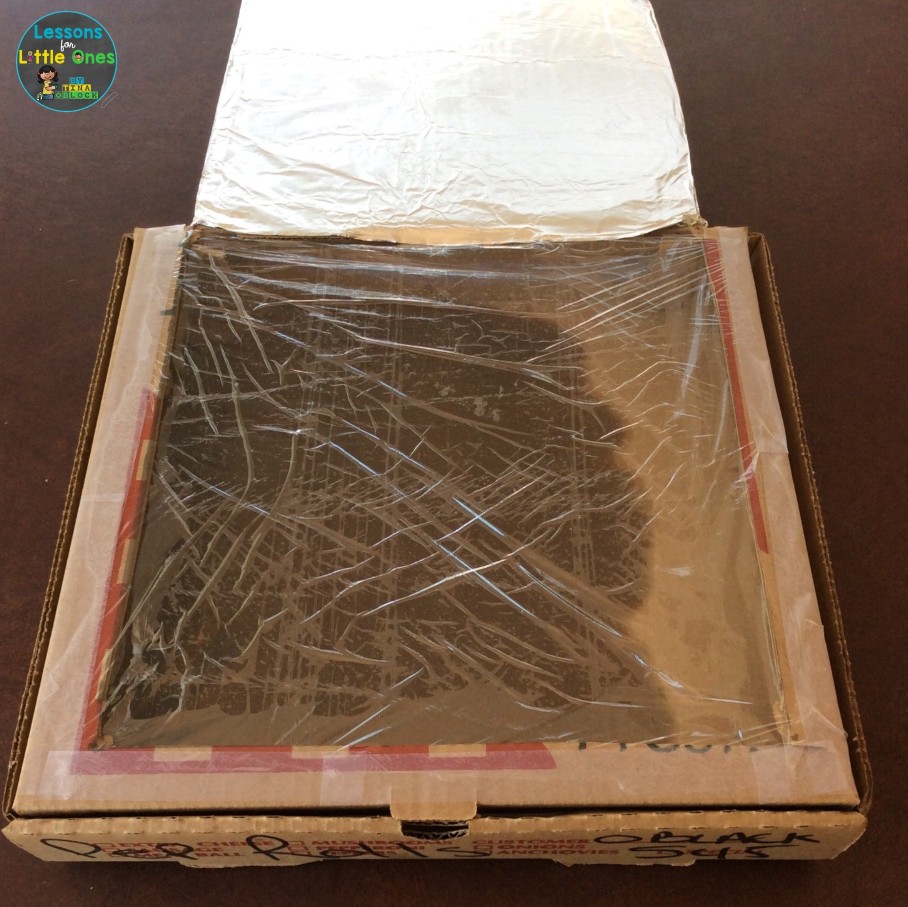
Open the lid and cover the opening in the lid with plastic wrap. Pull the plastic wrap taut and tape it to the box on all the edges. Make sure there are no holes in the plastic wrap and that it is completely sealed. It is important to have a tight seal. This “window” helps keep the sun’s heat in the box.

Close the lid and cover the top side of the opening with plastic wrap. Pull the plastic wrap taut and tape it to the box on all 3 sides. Make sure there are no holes in the plastic wrap and that it is completely sealed. It is important to have a tight seal. Having an airtight seal is important in keeping the oven hot.
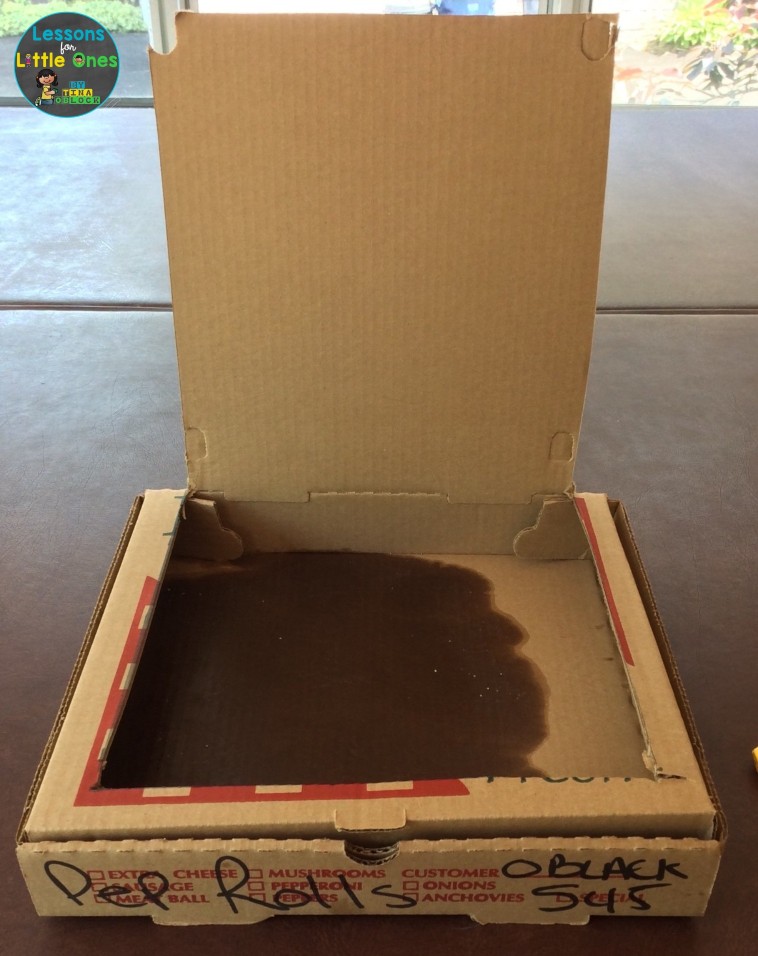
Glue a layer of aluminum foil in the bottom of the pizza box for insulation.

Cover the foil with pieces of black construction paper and glue them in place. The black paper will absorb light and generate more heat inside the box.

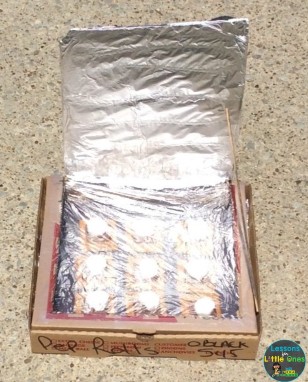
Place the s’mores snacks on the black paper. Make sure they are directly below the plastic wrap window.

On a bright, sunny day place the solar oven outside in direct sunlight. Adjust the foil flap to find the best angle for reflection. Use a ruler or stick to keep the flap propped up in place.

Leave the solar oven in the sun for anywhere from a half hour to up to 2 hours depending on the outdoor temperature and how direct the sunlight. Check on the s’mores every 15 minutes to half hour. Allow students to observe the effect of the sun on the chocolate and marshmallows. When the chocolate and marshmallows are melted they are ready to eat.


While students are waiting for their solar s’mores, I have them draw the snack in the solar oven on a recording page and write what they think will happen.

We also discuss how the solar oven works.
The solar oven uses solar energy (light and heat from the sun) to cook food. The foil reflects the sun’s light into the box. The plastic wrap “window” works similar to a greenhouse. It allows the reflected and direct sunlight into the box while retaining the heat inside. The black paper absorbs the sunlight making it warm which heats the food on top of it. All of this allows the solar oven to absorb more heat than it releases.
After enjoying our delicious solar s’mores snack, I have students record what actually happened and what they learned. We also upload an actual photo of the solar oven to our Seesaw journals and then each student uses the Record and/or Draw tools to talk about it and what they learned.


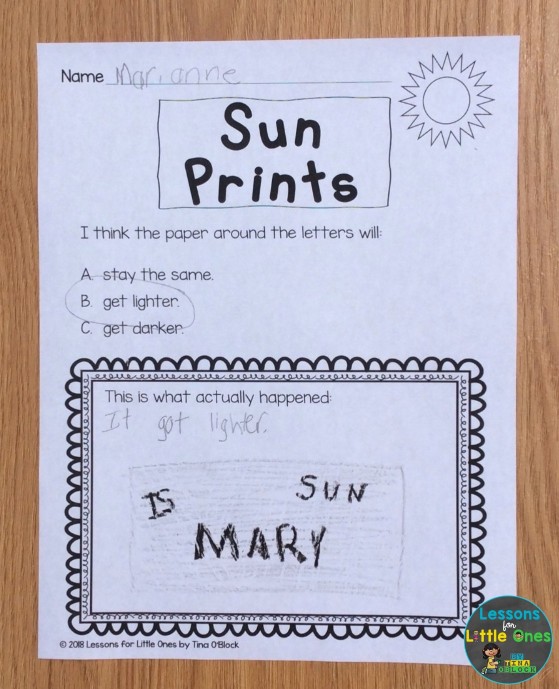
Sun Prints Science Experiment
This experiment demonstrates that the light from the sun can cause chemical changes.
You don’t have to buy the special paper for this experiment, all you need is cheap construction paper that is NOT fade resistant (the cheaper the better).
Take students outdoors to a sunny area. Give each student a piece of construction paper and allow them to arrange some magnetic letters on it. They can spell their names, sight words, or just place random letters on their papers.


If magnetic letters are not available you can use any objects or toys that will block the sunlight such as blocks, Legos, Unifix Cubes, or objects from nature such as rocks, sticks, leaves (if using leaves use tape or sticky tack to attach the leaves to the paper because they will curl in the heat).


Tell students you are going to leave their papers in the sun for several hours. Go back inside and have students predict what they think will happen to the paper around the letters (the part of the paper exposed to the sun). I like to have students record their predictions.

Go back outside after several hours, remove the magnetic letters or objects from the paper, and observe the results. The paper should be lighter in color resulting in sun prints of the objects.
Ask children why they think the paper underneath the objects is a different color than the uncovered parts. Explain that not only does the sun make things warm, but it also can cause chemical changes. The sun’s ultraviolet rays can break down the chemical bonds in the paper and thus fade the color causing a bleaching effect.


Afterwards I like to have students draw and write what actually happened or upload an actual photo in Pic Collage.

We have also “app smashed” and created before and after collage in Pic Collage and then uploaded them to Seesaw. Once in Seesaw, students used the Record tool to tell their observations.

Why Do We Need Sunscreen? Sun Science Experiment
This experiment helps students understand the importance of wearing sunscreen when outdoors and gives them a good visual of the damaging effects of the sun.
You can choose to let each student make their own experiment or just make one for the class to observe.
Before beginning, ask the students why we should wear sunscreen when outdoors (to protect our skin from the sun).
Tell them that you are going to do a science experiment that helps show the importance of wearing sunscreen.
Fold a dark piece of construction paper in half and write “With Sunscreen” on one half and “Without Sunscreen” on the other half. Rub a SMALL amount of sunscreen on the “With Sunscreen” side. You want the sunscreen to absorb into the paper so don’t use a large amount.

Place the papers outside in the sun for several hours.
Have students predict what they think will happen to the paper without sunscreen. I created a simple recording page for them to circle their predictions.
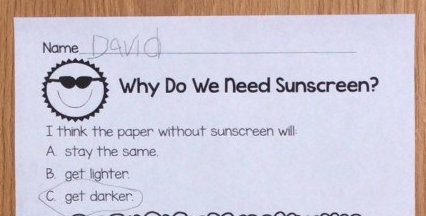
Go outside after several hours and observe the changes to the paper. The paper without sunscreen will be faded or bleached. Any area with sunscreen should have stayed protected and be darker.
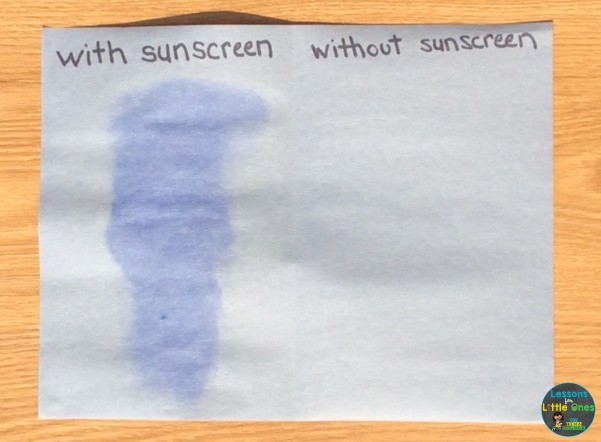
The sun’s ultra violet (UV) rays (UVA & UVB) can damage our skin. The ingredients in sunscreen protect our skin from these harmful UV rays. The chemical ingredients in the sunscreen on the paper absorbed the UV radiation from the sun and prevented them from fading/bleaching the paper.
After discussing the results I check students’ understanding by having them draw what actually happened (or upload an actual photo if using Pic Collage) and then writing why we should use sunscreen.


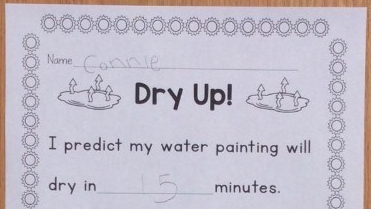
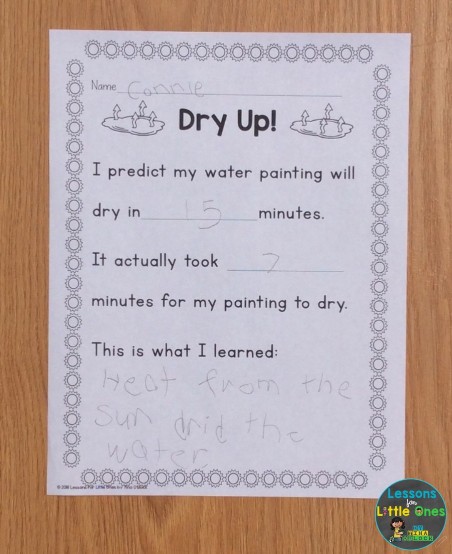
The Sun Dries Water Experiment
This experiment helps students understand that the sun dries up water and introduces evaporation.
Tell students that they are going to go outside and paint with water. Ask if they think their paintings will last all day. After concluding that the heat from the sun will dry their paintings, have them estimate how long they think it will take for the sun to dry up their paintings and have them write it down.
Take students outside and allow them to paint the sidewalk, playground area, etc, with water. After they paint one picture or word or after they have painted for a set period of time, set a timer and see how long it takes for their paintings to dry. Drying times will vary depending on the outdoor temperature.
I have found that young students love doing this activity and it can keep them busy for hours. They love using “grown up” paint rollers and brushes, paint trays, etc. to paint just about anything outside (the ground, the playground equipment, the building, the fence, etc.). It is great gross motor skill practice! They can paint sight words, letters, numbers, shapes, etc. as well for extra skill practice.


You can also have students paint in both the sun and the shade and predict drying times for each.
To better demonstrate water evaporation, paint a piece of construction paper with water and then seal it inside a Ziploc bag with enough air inside so the top of the bag doesn’t touch the paper. Place it in a sunny area (certain colors of construction paper can bleed when wet, place the baggie on a cookie sheet or newspaper if desired). Observe the baggie after the water starts to dry and condense on the baggie. Lead students to understand that the water from the paper evaporated and turned to water vapor which was trapped in the bag and condensed on the top as water droplets.


I like to have students record their results and what they learned. When teaching pre-k students, I had them draw what they painted since it was hard for them to write all they had learned. Then, we would upload a collage of photos from Pic Collage to their Seesaw journals and they could use the Record tool to tell what they learned which was much easier for them.


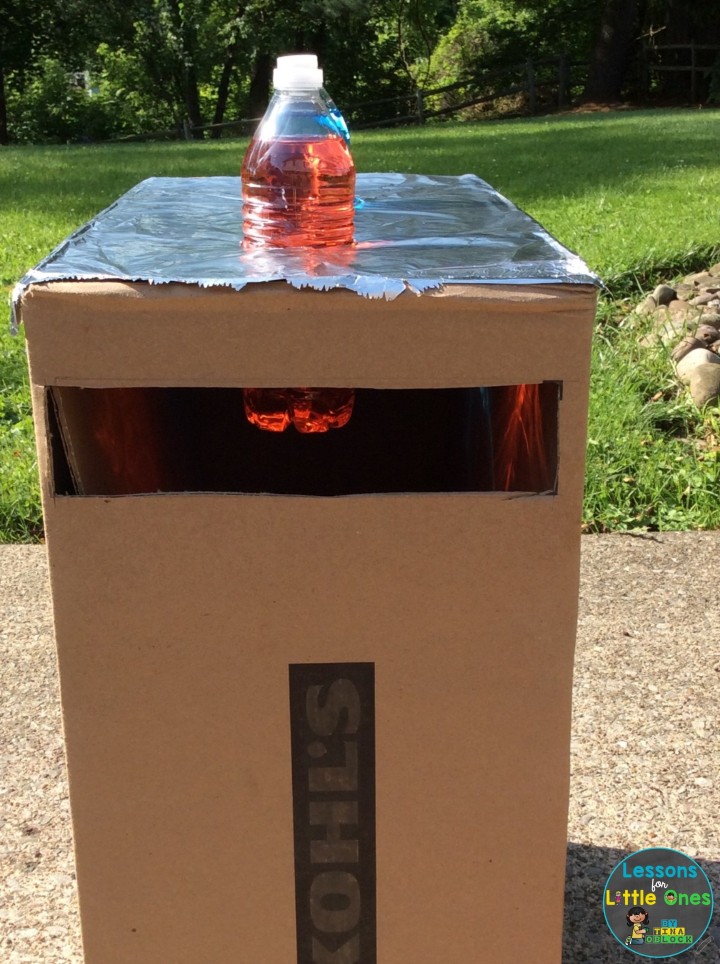
Light Box Experiment
Another favorite! You will be amazed by the results of this simple experiment!
This experiment demonstrates and introduces refraction of sunlight.
This experiment works best on a very bright, sunny day.
Get 4 bottles with water. Leave one clear and place a few drops of food coloring in the others.

Tape a large box shut. Trace the bottom of one of the water bottles twice on the top of the box and cut out. Cover with foil to help reflect sunlight.


Cut a small viewing hole in one side of the box. Place it in a bright, sunny area and place 2 water bottles in the holes.

Have students take turns looking inside. They will be able to view a light show!
Depending on the angle of the sun, the lights will show on the sides of the box or if the sun is high in the sky the lights will show all through the box. Allow students to experiment with changing the bottles and position of the box to see how it affects the lights inside.
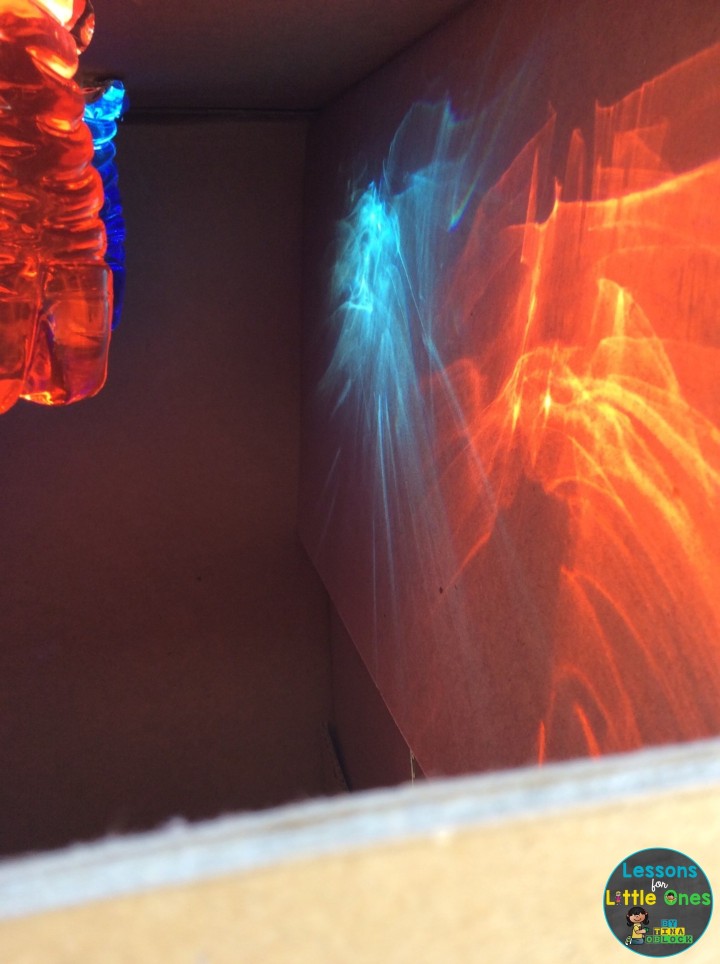


After students have had time to view the lights and experiment with the light box discuss their observations and use the information below to explain refraction.
When the sunlight hits the water in the bottle, it bends in all directions. The light is going from the air to the water. Water is more dense than air, so it causes the light to slow down and change direction. The water makes the light spread out in the box. This is called refraction.
Check students’ understanding by having them draw and write what they observed and learned or upload actual photos in Pic Collage.


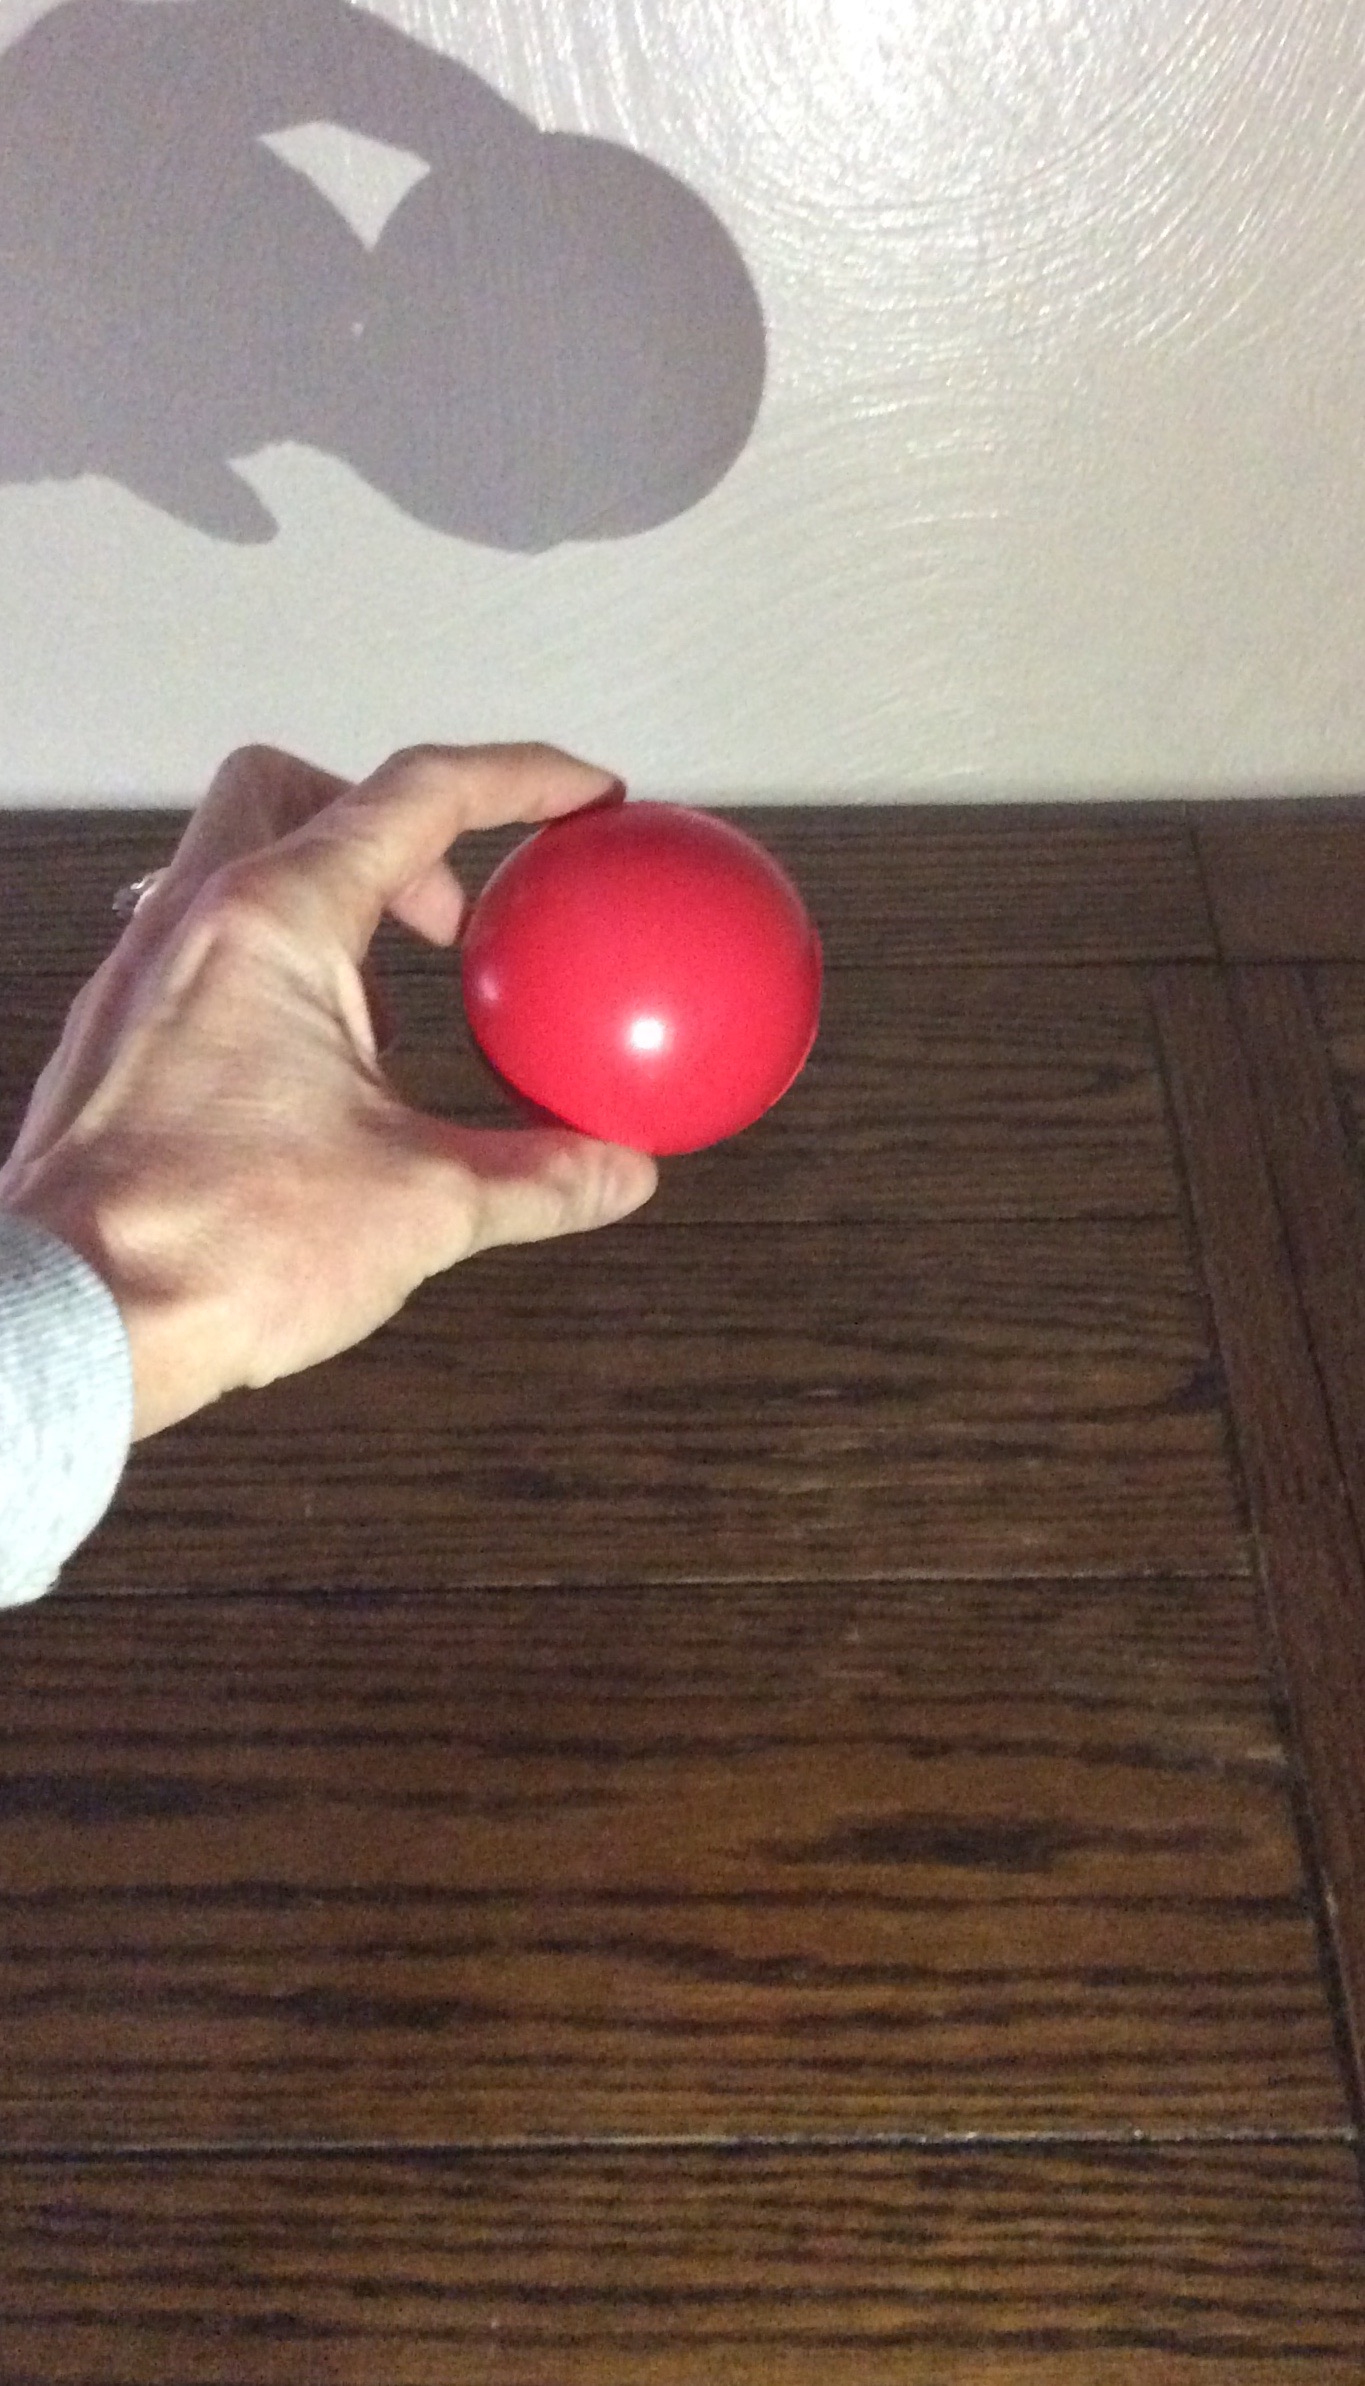
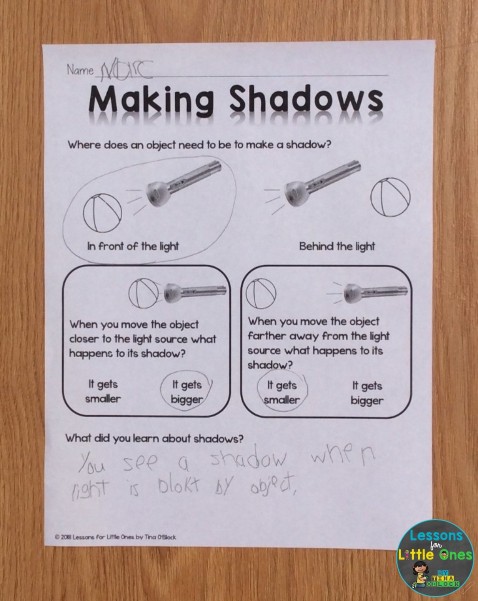
Making Shadows
This experiment helps children understand what is needed to make a shadow and that the sun acts as a light source for shadows.
Dim the lights. Hold up an object. Use a flashlight, a flashlight app, or a spotlight to shine light on the object so the shadow can be seen on a wall.

Turn off the flashlight. Turn the flashlight back on. Ask the students what is needed to see the object’s shadow? (light source) What shape is the shadow? Does the light shine through the object? Explain that the object blocks the light which makes a dark spot or shadow. Turn and move the object or your hand and ask students what happens to the shadow (it moves too).
For an added challenge, show some clear or translucent objects such as tissue paper, plastic containers, wax paper. Ask students how these shadows look different than the solid object’s shadow or your hand (they are not as distinct). Remind them that a shadow is an object that blocks light. See if they can draw conclusions as to why the clear objects’ shadows were not as distinct (they do not block as much light, some of the light shines through).
Allow students to make shadows on the wall using their bodies or objects. Ask them how they can make the shadow bigger and smaller (move closer to the light to make the shadow bigger, move farther away from the light to make the shadow smaller).

I like to have students complete these exit tickets for the experiments.
Head outside on a sunny day to look for shadows. Prior to going outside, ask students if they think they will see any shadows and why.
Explain that when you are outside, the sun is the light source that creates shadows.
Go on a “shadow hunt” and observe the shadows of trees, buildings, cars, etc. Observe whether an object’s or person’s shadow moves if it moves and if its shape resembles the shape of the object or person.
Optional: Take photos of the shadows the students find.


We create collages of the shadow pictures using Pic Collage and then upload them to Seesaw where students talk about our shadow hunt.

I also do a quick check of students’ understanding of shadows and their shapes with this shadow matching activity page.

Paper Plate Sundial Experiment
In this experiment each student makes their own sundial from a paper plate, play dough or clay, and a pencil.
Allow students to decorate their paper plate with warm colors (orange, red, yellow) of paint, markers, or crayons.


After the paint dries, have students press a ball of play dough or clay in the center of their plates and then stick a pencil in the play dough or clay to resemble a sundial.
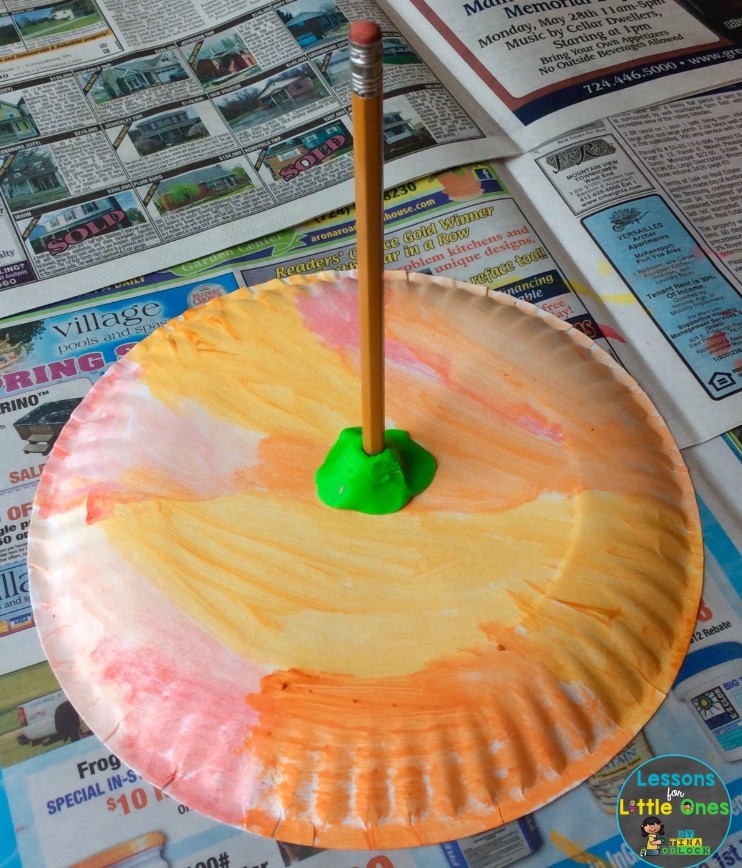

Take the sundials outside and place them in a sunny area (choose an area that stays sunny throughout the time period that you will be checking the sundials. You don’t want any shadows cast on the sundials during the experiment).
If it is breezy or windy, place a few rocks on the sundials to keep them in place. It is important that they do not move during the observation period.


Have students draw a line on the paper plate where the shadow from the pencil falls and write the time of day.
Come back out in one hour or 2 hour intervals to observe and record the length and position of the shadow and observe the sun’s position in the sky. Students can also make predictions as to where they think the shadow will be each time.

Optional: During the early morning and late afternoon hours when the sun is low in the sky, the shadow will be longer and not fit on the plate.
You can make a larger sundial using a piece of poster board or cardboard to better demonstrate how the sun’s position affects a shadow’s length. Insert a pencil or straw into a ball of clay or play dough and attach it to the sheet of poster board or cardboard. Trace the shadows at each interval.

Ask questions to help students draw conclusions as to what they observed (the sun’s position in the sky affects a shadow’s length and position, it is longer when the sun is low in the sky, shorter when the sun is high in the sky, the paper plate looks similar to a clock).
What did you observe about the shadow and the sun?
Did the sun change position?
Which direction did your shadow move?
When was the shadow the longest? The shortest?
Why did the shadow change?
Explain that before clocks were invented, people had to rely on the position of the sun throughout the day to tell time. One of the earliest devices for telling time was the sundial. A sundial works by casting a shadow in different positions, at different times of the day. The angle of the light (sun) affects the size of the shadow. The sun is highest in the sky at midday and casts a short shadow. In the morning and afternoon, when the sun is lower in the sky, the shadow is longer.
A sundial has a pole, or gnomon, in its center and markings that tell the time like a clock. When the sun shines on the gnomon, shadows are cast at different markings on the sundial. People were able to tell the time based on the particular mark of time on which the sun’s shadow fell.
Check students’ understanding by having them draw and write what they observed and learned or use Pic Collage.


Human Sundial Sun Experiment
In this experiment each student acts as the center point or gnomon of the sundial.
Divide students in pairs – each student will need to work with a partner (they will trace each other’s shadows).
Find a large area that stays sunny for a majority of the day (or at least 4 hours) and has a surface that can be written on with sidewalk chalk (the basketball court, sidewalk, etc.). It has to have enough area for students to spread out (if they are too close to one another their shadows will overlap).
It is important that students stand in the same place and face the same direction for each observation and shadow tracing. Once each pair of students has found an area, have them draw an X with the sidewalk chalk to mark where each of them will stand. Make sure they are far enough apart from one another to allow room for their shadows as the shadows will move throughout the experiment.
Have each pair of students take turns tracing one another’s shadows with the sidewalk chalk. (one stands on the X while the other traces the outline of their shadow).


Repeat the shadow tracings every hour. Remind students to stand on the X facing the same direction each time. You can do as many tracings as your schedule allows. At least 3-4 should be sufficient for students to notice the changes in their shadows’ sizes and positions.

I like to have students record each observation and then after doing several tracings have them predict where they think their shadow will be during the next tracing.
I also have them record what time of day their shadow was longest and shortest and draw conclusions.

If you would like to use the printable recording pages with your students plus get more detailed step by step directions with photos for easy set-up as well as additional technology integration ideas CLICK HERE to download my Sun Science Experiments & STEM resource.

Have engaging science experiments and STEM activities throughout the entire school year with this money-saving Science & STEM Bundle!

Book Suggestions:


Pin it for later!